
အမှာစာ
Design Pattern နဲ့ ပတ်သက်ပြီး မြန်မာ Developer တွေ ကြားမှာ ကျယ်ကျယ်ပြန့်ပြန့်ပြောတာ မတွေ့သလို ရေးသားထားသည့် ဆောင်းပါးတွေလည်း နည်းပါးတာကို တွေ့ရပါတယ်။ MIU မှာ Design Pattern သင်ဖြစ်သည့် အခါမှာတော့ မြန်မာလို ပြန်ရေးမယ် လို့ စိတ်ကူးပြီး ပြန်ရေးခဲ့ပါတယ်။ အခုစာအုပ်ကတော့ ဒုတိယ အကြိမ် ပြန်ရေးထားသည့် စာအုပ်ပါ။ ပထမ အကြိမ်မှာ ရေးသားထားတာတွေ အကြမ်းဖြစ်ပြီး နားလည် ခက်သည့် အပိုင်းတွေ ပါနေတာ ကြောင့် နောက်တစ်ကြိမ် ပြန်ရေးသားထားပါတယ်။
ဒီစာအုပ် ကို မဖတ်ခင်မှာ UML class diagram ကို နားလည် ထားဖို့ လိုပါလိမ့်မယ်။ ဒီစာအုပ်မှာ UML Class Diagram တော်တော်များများ ပါဝင်ပါတယ်။ ဒါကြောင့် Design Pattern စာအုပ်ကို ဒုတိယ အကြိမ်ပြန်ရေးသည့် အခါမှာ အပိုင်း ၂ ပိုင်း ခွဲပြီး ရေးသားထားပါတယ်။ UML စာအုပ် နဲ့ Design Pattern စာအုပ် အပိုင်းပါ။ အစက ၂ အုပ် သီးသန့် ထားဖို့ ဖြစ်ပေမယ့် စာဖတ်သူ အဆင်ပြေအာင် တစ်အုပ်ထဲ ပေါင်းထားလိုက်ပါတယ်။
Design Pattern မဖတ်ခင်မှာ နောက်ထပ် နားလည်ဖို့ လိုတာကတော့ SOLID Principle ပါ။ SOLID ကို နားမလည်ရင် ဘာကြောင့် design pattern တွေ လုပ်နေရလဲ သဘောပေါက်မှာ မဟုတ်ပါဘူး။ SOLID principle နဲ့ ပတ်သက်ပြီး အသေးစိတ်ကို https://bit.ly/solid-saturngod မှာ တင်ထားပါတယ်။ ဒါကြောင့် SOLID Principle သိပြီးမှ စာအုပ်ကို ဖတ်ဖို့ တိုက်တွန်းလိုပါတယ်။
UML မိတ်ဆက်
UML ဟာ system တစ်ခု ကို ဖန်တီးသည့် အခါမှာ system အကြောင်းကို document အနေနဲ့ ပြန်ဖတ်သည့် အခါမှာ ဖြစ်ဖြစ် နားလည် လွယ်အောင် ရေးဆွဲထားသည့် ပုံတွေပါပဲ။ Design Pattern ကို လေ့လာ ဖို့ အတွက် UML ကို အရင် ဆုံး သိနေဖို့ လိုပါတယ်။ UML စာအုပ်ကို မဖတ်ခင်မှာ ဦးစွာ Object-oriented programming (OOP) ကို နားလည်နေ ဖို့ လိုပါတယ်။ OOP မှာ ပါသည့် Interface, Abstract, Inheritance တို့ကို သိနေ မှသာ UML ကို လေ့လာလို့ ရပါလိမ့်မယ်။
Drawing Tool
UML ကို ရေးဆွဲဖို့ Software တွေ အများကြီး ရှိပါတယ်။ https://www.draw.io ဟာ free ရပြီး လက်ရှိ စာအုပ်မှာ ဖော်ပြမည့် Use Case Diagram, Class Diagram, Sequence Diagram တွေကို ရေးဆွဲဖို့ အဆင်ပြေပါတယ်။
နောက်ပြီး UML ကို PlantUML ကို သုံးပြီး ရေးဆွဲနိုင်ပါတယ်။ https://www.planttext.com/ မှာ စာသားဖြင့် ရေးသားပြီး UML class diagram, sequence diagram တွေကိုလည်း ရေးသားနိုင်ပါတယ်။
ဥပမာ
@startuml
class Customer {
}
class Account {

}

Customer -> Account

@enduml
အဲဒီလို Text အတွက် အောက်ပါ ပုံ အတိုင်း generate လုပ်ပေးပါတယ်။
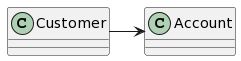
Customer class ထဲမှာ Account class ကို ယူသုံးမယ်ဆိုပြီး One Way Associations လုပ်ထားသည့် သဘောပါ။ နောက်ပိုင်း Chapter တွေမှာ Associations ကို ရှင်းပြပါမယ်။
နောက်ထပ် Free ရသည့် Tool ကော့ StarUML ( https://staruml.io/ ) ပါ။ လူသုံးများသည့် Software တစ်ခုပါ။ Export ထုတ်ရင်တော့ watermark ပါပါလိမ့်မယ်။
UML ဆိုတာ
UML
UML ဆိုတာက Unified Modeling Language ရဲ့ အတိုကောက်ဖြစ်ပြီး general purpose, developmental modeling language တစ်ခုပါ။တနည်းပြောရင် software engineering အတွက် design system ကို မြင်အောင် ဖော်ပြရေးဆွဲ သည့် language တစ်ခုပါ။ UML ဟာ လက်ရှိ version 2.5 အထိ ရှိသွားပြီ ဖြစ်ပါတယ်။
UML ကို Grady Booch, Ivar Jacobson, and James Rumbaugh တို့ သုံးယောက်ဟာ 1995 မှာ Rational Software တစ်ခုကို ဖန်တီးရင်း နဲ့ လုပ်ထားခဲ့တာပါ။ နောက်ပိုင်း 1997 မှာ Object Management Group ဟာ UML ကို standard အနေနဲ့ အသုံးပြုလာပါတယ်။ Object Management Group မှာ HP, IBM, Apple စသည့် company ကြီးတွေ ပါဝင်ပါတယ်။
Diagram
UML ကို Diagram တွေ နဲ့ ရေးဆွဲပြီး UML မှာ ပါရှိသည့် diagram တွေကတော့ အောက်ပါ အတိုင်း ဖြစ်ပါတယ်။
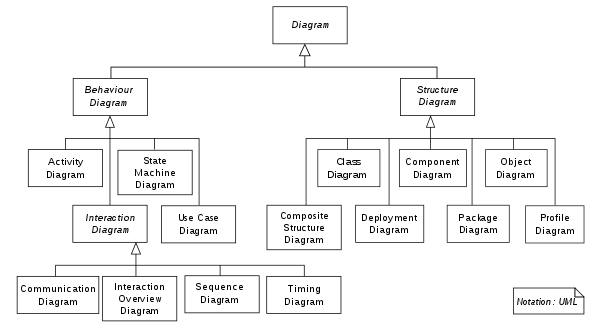
ဒီစာအုပ်ထဲမှာတော့ အကုန်လုံး ဖော်ပြပေးနိုင်မှာ မဟုတ်ပါဘူး။ Software Development ပြုလုပ်သည့် အခါ လူသုံးများသည့်
- Use Case Diagram
- Sequence Diagram
- Class Diagram
စသည့် ၃ မျိုးကို ဖော်ပြပေးမှာပါ။
Structure Diagrams
Structure diagrams ဟာ system မှာ ပါဝင်သည့် ပုံစံ ကို ဖော်ပြပေးထားတာပါ။ System တစ်ခုကို မတည်ဆောက်ခင် structure diagrams တစ်ခုခု ကို သုံးပြီး ဖန်တီးပါတယ်။ Software architecture document ပြုလုပ်ပေးသည့် အခါမှာ ထည့်သွင်း ဖော်ပြကြပါတယ်။ Class Diagram ဟာ structure diagram တစ်ခု ဖြစ်ပါတယ်။
Behavior Diagrams
Beahaivor diagrams ကတော့ dynamic ဖြစ်ပါတယ်။ System မှာ ဘာတွေ ဖြစ်နေလဲ။ System မှာ ဘယ်လို function တွေ ပါပြီး ဘယ်သူတွေ က လုပ်ဆောင်နေလဲ ဆိုတာကို ဖော်ပြပေးပါတယ်။ Use Case Diagram ဟာ beahivor diagrams အမျိုးအစား တစ်ခုပါ။
Interaction Diagram
Interaction diagrams ဟာ system flow ကို ဖော်ပြပေးတာပါ။ Models တစ်ခု နဲ့ တစ်ခု ဘယ်လို အလုပ်နေတယ်။ Sequence Diagram ဟာ interaction diagram တစ်ခု ဖြစ်ပြီး system တစ်ခု လုံး ဘယ်လို အလုပ်လုပ်တယ် ဆိုတာကို အဆင့်ဆင့် ဖော်ပြပေးထားပါတယ်။
Use Case Diagram
System တစ်ခု စတင်ဖို့ အတွက် Use Case Diagram ဟာ အရေးကြီးပါတယ်။ Use Case Diagram ကို မစတင်ခင်မှာ Use Case တွေကို အရင်ဆုံး စဥ်းစားဖို့ လိုအပ်ပါတယ်။
Use Case
ATM system မှာ ငွေထုတ် ဖို့ အတွက် Use Case တွေကို ကြည့်ရအောင်။
| User Action | System Response |
|---|---|
| User မှ Pin ရိုက်ထည့် | System မှ PIN မှန် မမှန် စစ်ဆေး |
| Withdraw Amount ကို ရွေး | System မှ Withdraw Amount လုပ်နိုင်သည့် ပမာဏ ကို ဖော်ပြ |
| ငွေ Amount ရိုက်ထည့် | ငွေ Amount ရှိမရှိ စစ်ဆေး ပြီး ငွေထုတ်ပေး |
Use Case ဟာ System တစ်ခု အတွက် အရေးပါပြီး System တစ်ခုလုံးမှာ လိုအပ်သည့် requirement တွေကို တစ်ခါတည်း မြင်နိုင်ပါလိမ့်မယ်။
Use Case Diagram
Use Case Diagram မှာ ပါဝင်သည့် diagram တွေ ကို အရင်လေ့လာကြည့်ရအောင်။
| Diagram | Description |
|---|---|
 | Actor ကတော့ အသုံးပြုမည့်သူတွေ လုပ်ဆောင်မည့် သူတွေ ကို ရည်ညွှန်းထားပါတယ်။ |
 | Use Case ကတော့ Functional case တွေကို ဖော်ပြထားပါတယ်။ |
 | System ကတော့ လက်ရှိ system ကြီး တစ်ခုလုံးကို ဘယ် system ဖြစ်တယ် ဆိုတာကို ဖော်ပြထားခြင်း ဖြစ်ပါတယ်။ |
ATM System
ATM System တစ်ခုအတွက် Use Case တစ်ခု ရေးဆွဲကြည့်ရအောင်။
ATM System တစ်ခုမှာ Balance စစ်ခြင်း, ပိုက်ဆံ ထုတ်ခြင်း နှင့် ပိုက်ဆံ ထည့်သွင်းခြင်း တို့ ပါဝင်ပါမယ်။

System ဖြစ်သည့် recent box ကို ထည့်သွင်းမရေးဆွဲလည်း ဖြစ်ပါတယ်။ System တစ်ခု ထက်ပိုမှသာ ထည့်သွင်း ရေးဆွဲလို့ရပါတယ်။
Use Case Relationship
Use Case diagram မှာ <<include>> , <<extend>> နဲ့ Generalization ဆိုတာ ရှိပါတယ်။ Use Case တစ်ခုက နောက်ထပ် Use case တစ်ခု နဲ့ ဘယ်လို relationship ရှိနေတယ် ဆိုတာ ကို ဖော်ပြပေးတာပါ။

Invalid Password ဟာ Login Account ပေါ်မှာ depend ဖြစ်နေပါတယ်။ နောက်ပြီး Invalid Password ဟာ Login Account Use Case ကို extend လုပ်ထားတာပါ။

Place Order လုပ်ဖို့ အတွက် အရင်ဆုံး Login ဝင်ဖို့ လိုပါတယ်။ Place Order Use case မှာ Login User Case ပါဝင်နေပါတယ်။

generalization relationship က တော့ parent နဲ့ child သဘောပါပဲ။ Use case နှစ်ခုဟာ parent နဲ့ child relationship ရှိနေသည့် သဘောပါပဲ။
Online Ebook Website System
System တစ်ခု ဆွဲကြည့်ရအောင်
- User က စာအုပ်တွေကို Search လုပ်နိုင်တယ်
- User က စာအုပ်တွေကို browse လုပ်နိုင်တယ်
- User က Login ဝင်လို့ရတယ်
- Login ဝင်သည့် အခါမှာ password မှားနေရင် မှားနေ ကြောင်း ပြရမယ်
- စာအုပ်ဝယ်သည့် အခါမှာ Login ဝင်ထားပြီးသား ဖြစ်ရမယ်
- Download ချသည့် အခါမှာလည်း Login ဝင်ထားဖို့ လိုတယ်
- Admin က စာအုပ်တွေကို manage လုပ်နိုင်မယ်
ဒီ စနစ်ကို ကြည့်လိုက်ရင် Actor ၂ ယောက် ပါတာကို တွေ့နိုင်ပါတယ်။ Use Case တွေက တော့ ရှင်းပါတယ်။ ပုံလေး ဆွဲကြည့်ရအောင်။
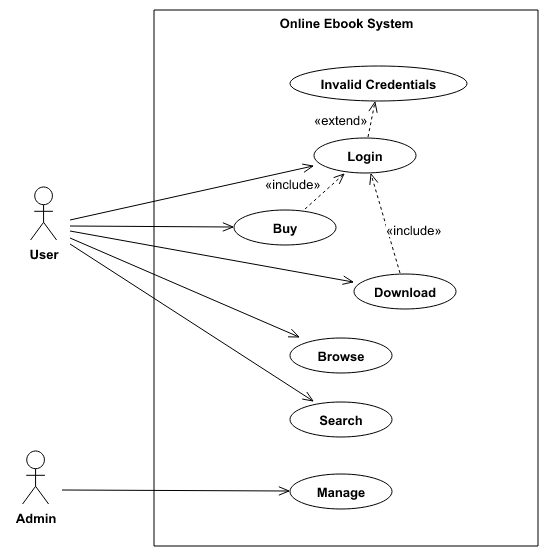
Use Case Diagram ဆွဲထားခြင်း အားဖြင့် System ကို ပိုပြီး နားလည် စေပါတယ်။ Project တစ်ခုလုံးမှာ ဘယ် system တွေက ဘယ် system တွေ နဲ့ ချိတ်ဆက်ထားတယ်။ ဘယ်လို depen ဖြစ်နေတယ် ဆိုတာကို သိနိုင်ပါတယ်။
Sequence Diagram
Sequence Diagram ဟာ UML မှာ အရေးပါသလို Project တွေ ဖန်တီးရာမှာလည်း အရေးပါပါတယ်။ Sequence Diagram ဟာ system တစ်ခု မှာ ဖြစ်သွားသည့် အဆင့်ဆင့် ကို ရေးဆွဲဖော်ပြထားခြင်း ဖြစ်ပါတယ်။ System မှာ ဘယ် အဆင့်တွေ အလုပ်လုပ်သွားတယ်။ ဘယ် အဆင့်ပြီးရင် ဘယ်ကို ခေါ်သလဲ ဆိုတာကို sequence diagram မှာ မြင်နိုင်ပါတယ်။ သူက behavioral diagram တစ်ခု ဖြစ်ပါတယ်။
Sequence Diagram
Sequence Diagram ပုံကြမ်း တစ်ခုကို ကြည့်လိုက်ပါ။ ပုံကို ကြည့်လိုက်တာ နဲ့ sequence diagram ဆိုတာ ဘာလဲ ဆိုတာ သဘောပေါက်သွားမှာပါ။

Actor
Sequence Diagram မှာ Use Case လိုပဲ လုပ်ဆောင်သည့်သူ Actor ပါဝင်ပါတယ်။ External Subject တွေကို လည်း actor အနေနဲ့ သတ်မှတ်လို့ရပါတယ်။
Lifeline
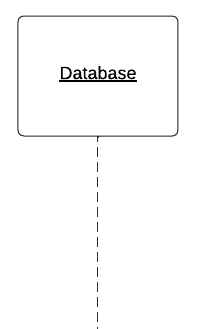
Lifeline က interaction တစ်ခုကို ဖော်ပြထားတာပါ။ ဘာ လုပ်မယ်။ အချိန် ဘယ်လောက်ကြာမယ်။ ဘယ် အချိန်မှာ ရပ်သွားမယ်။ စတာတွေကို Lifeline မှာ ဖော်ပြထားပါတယ်။
Activations
**
**
Activations ကတော့ Lifeline မှာ ဆွဲထားသည့် လေးထောင့် အတုံးလေး ဖြစ်ပြီး operation ရဲ့ အချိန် ကို ဖော်ပြထားတာပါ။
Call Message

Activations တစ်ခု နဲ့ တစ်ခု ကြားက interaction ကို ဖော်ပြသည့် ဖော်ပြချက်ပါ။ ဘာ လုပ် လိုက်သလဲ ဆိုတာကို ဖော်ပြထားတာ မျိုးပါ။
Return Message
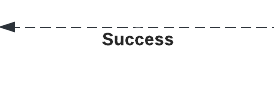
Operation ပြီးသွားလို့ ပြန်လာသည့် return message ပါ။ Function တစ်ခုကနေ return ပြန်လိုက်သလို မျိုး ကို ဖော်ပြပေးပါတယ်။
Self Message
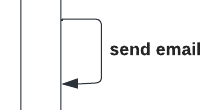
Self Message ဆိုတာကတော့ ကိုယ့် Lifeline ကို ကိုယ် ပြန်ခေါ်သည့် သဘောပါ။
Recursive Message

ကိုယ့် Lifeline မှာ ကိုယ် ပြန်ခေါ်ပြီးတော့ operation process time ရှိနေသည့် သဘောကို ဖော်ပြခြင်သည့် အခါမှာ ရေးဆွဲပါတယ်။
Stopped

Lifeline တစ်ခု ပြီး ဆုံး တာကို ဖော်ပြထားခြင်း ဖြစ်ပါတယ်။
Alternative 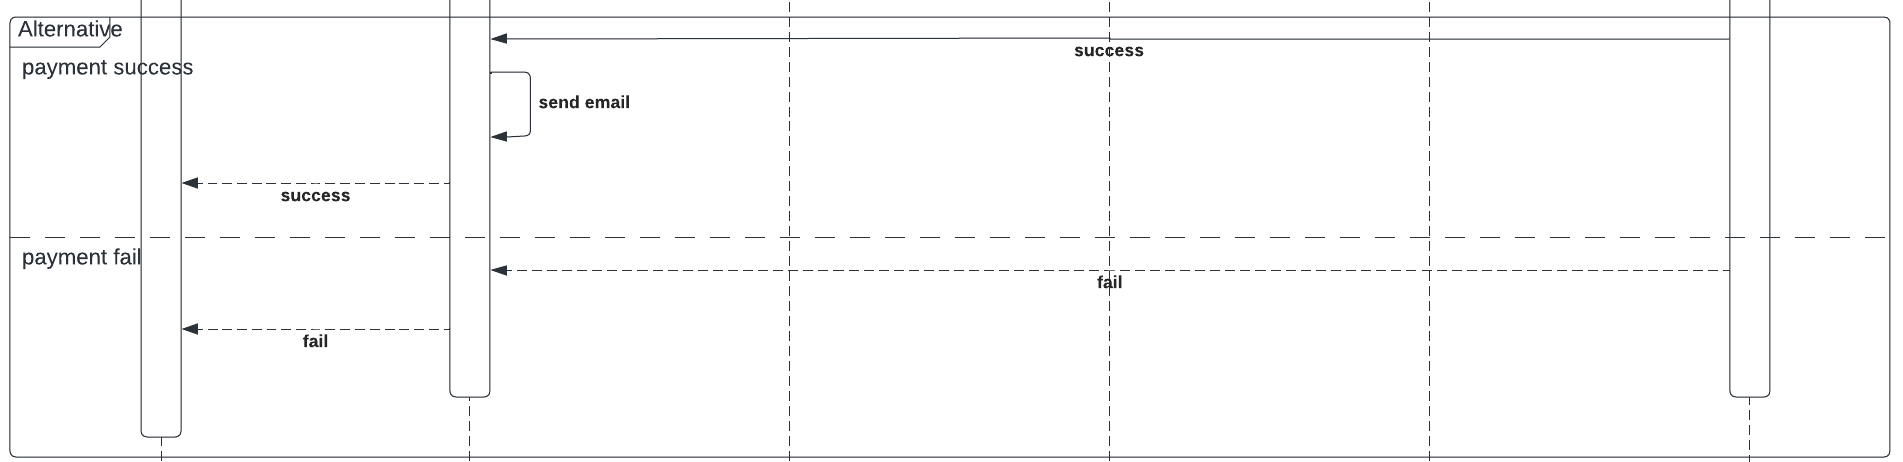
Alternative ကတော့ condition တစ်ခုခု success ဖြစ်ခဲ့ရင် ဘယ် flow ကို သွားမယ်။ fail ဖြစ်ရင် ဘယ်လို flow သွားမယ် ဆိုပြီး ပိုင်းခြားပြီး ရေးဆွဲထားခြင်းဖြစ်ပါတယ်။
Loop

Loop လည်း အတူတူပါပဲ။ Condition တစ်ခု အထိ သွားမယ် ဆိုပြီး ထည့်သွင်းရေးဆွဲခြင်းပါ။
ဘာကြောင့် သုံးသင့်လဲ
Sequence Diagram က system design တစ်ခုကို ရှင်းပြသည့် အခါမှာ မဖြစ်မနေ အသုံးဝင်ပါတယ်။ ဥပမာ payment gateway system တစ်ခု ဆိုပါဆို့။ User က ဘယ်လို payment လုပ်သွားတယ်။ ဘယ်အဆင့်တွေကို ခေါ်ပြီး server ကို data တွေ ဘယ်အချိန်မှာ ပြန်ရောက်လာမယ် ဆိုတာကို စာတွေ့ ရှင်းပြနေခြင်းထက် sequence diagram ရေးဆွဲပြီး ရှင်းပြသည့် အခါမှာ နားလည် လွယ်ပါလိမ့်မယ်။
Sequence Diagram က မခက်ခဲ သလို system အစိတ်အပိုင်း ခြင်း တစ်ခု ဆီကို အဆင့်တိုင်း အဆင့် တိုင်း ဖော်ပြပေးနိုင်ပါတယ်။
Class Diagram
Class Diagram တစ်ခု ဖန်တီး ဖို့ အတွက် System အကြောင်းကို ဦးစွာ နားလည် ဖို့ လိုပါတယ်။ လက်ရှိ System က ဘာကို ဖန်တီး ချင်တာလဲ။ ဘာတွေ လိုအပ်တယ်ဆိုတာကို ဦးစွာ Analysis လုပ်ရပါမယ််။ ပြီးသည့် အခါမှာ လိုအပ်သည့် class တွေကို ခွဲထုတ်ပြီး class diagram ကို ဖန်တီးပါတယ်။ Class တစ်ခု နဲ့ တစ်ခု realtion တွေကို ဖော်ပြသည့် အခါမှာ
- Association
- Dependency
- Inheritance
စသည် တို့ နဲ့ ဖော်ပြပါတယ်။
Associations
Associations ဆိုတာက class တစ်ခု က နောက်တစ်ခုကို အသုံးပြုထားတယ် ဆိုတာကို ဖော်ပြထားခြင်း ဖြစ်ပါတယ်။
public class Customer {
 private Account checkingAcount;
 public void createNewAccount() {
  checkingAccount = new Account();
 }
}
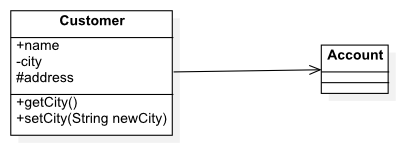
ဒီ code မှာ Customer class မှာ Account class ကို ယူသုံးထားပါတယ်။ အဲဒီလိုမျိုး code အတွက် class ကို အောက်ပါ အတိုင်း ဆွဲပါတယ်။

One-way associations ဖြစ်သည့် အတွက် Arrow နဲ့ သုံးထားတာကို တွေ့နိုင်ပါတယ်။ A to B သဘောမျိုးပါ။
အကယ်၍ A to B , B to A relation ရှိနေပြီ ဆိုရင်တော့ Arrow မပါတော့ပါဘူး။ ဥပမာ Customer class က Order ကို သုံးမယ်။ Order ထဲမှာလည်း Customer ပါတယ်။ ဒါဆိုရင် Two-way associations ဖြစ်ပါပြီ။
Attributes
Class diagram မှာ properties တွေ ကို Access Modifier ပေါ်မှာ မူတည်ပြီး အနည်းငယ် ပြောင်းလဲဖော်ပြပါတယ်။
public class Customer {
 public String name;
 private String city;
 protected String address;
 private Account account;

 public String getCity() {
  return city;
 }

 public void setCity(String newCity) {
  city = newCity;
 }
}
အဲဒီ အခါ class diagram ကို အောက်ပါ အတိုင်း ဆွဲပါတယ်။
- public ကို +
- private ကို -
- protected ကို #
အနေနဲ့ သုံးပါတယ်။ Account ကတော့ class ဖြစ်သည့် အတွက် direct associations ကို သုံးပါတယ်။
Association ရဲ့ နာမည်တွေဟာ Verb ဖြစ်နေဖို့လိုပါတယ်။ ဥပမာ
- Professor advises a Student
- Library has books
- Student enrolls in a Class

Association Multiplicities
Association မှာ တစ်ခု နဲ့ တစ်ခု ပါဝင် ပတ်သက်မှုကို ဖော်ပြပေးသည့် Multiplicities ဆိုတာ ရှိပါသေးတယ်။
| Number | Description |
| 1 | One (mandatory) |
| 3 | Three (exactly) |
| * | Many |
| 0..* | zero or more (optional) |
| 1..* | one or more |
| 0..1 | zero or one (optional) |
Multiplicities ကို အောက်ပါ အတိုင်း class တွေပါ အသုံးပြုပါတယ်။
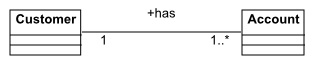
ဒီ diagram မှာ ဆိုရင် Multiplicities ရဲ့ အဓိပ္ပာယ်က
- Customer တစ်ယောက်မှာ account ၁ ခု သို့မဟုတ် တစ်ခု ထက် မက ရှိတယ်။
- Account တစ်ခုဟာ Customer တစ်ယောက် အတွက်ပဲ။
Code အရ ကြည့်မယ် ဆိုရင်
public class Customer {
 private String name;
 private List<Account> accounts;

 public Customer(String name) {
  this.account = new ArrayList<Account>();
  this.name = name;
 }

 public String getName() {
  return name;
 }

 public String addAccount(Account account) {
  this.accounts.add(account);
 }
}
public class Account {
 private String accountNumber;
 private double balance;
 private Customer customer;

 public Account(String accountNumber) {
  this.accountNumber = accountNumber;
 }
 public void setCustomer(Customer customer)  {
  this.customer = customer;
 }
 public Customer getCustomer() {
  return this.customer;
 }
 public String getAccountNumber() {
  return this.accountNumber;
 }
 public double getBalance() {
  return this.balance;
 }

}
Aggregation
Aggregation က whole-part relationship အတွက် အသုံးပြုပါတယ်။ Association မှာ contains အနေနဲ့ ပြောခဲ့ပြီးပါပြီ။ Aggregation အနေနဲ့ code အနေနဲ့ အတူတူပါပဲ။ Aggregation က ဘယ်လို နေရာမှာ အသုံးပြုလဲ ဆိုတော့
class Child {}
class Mother {
    List<Child> children;
}
Class Diagram အရ အောက်ပါအတိုင်း ဖော်ပြပါတယ်။

တနည်းအားဖြင့် realtion က အရမ်း strong ဖြစ်တယ်။ Child class ဟာ Mother class မရှိပဲ မရပ်တည်နိုင်ပါဘူး။ အဲဒီလို case တွေမှာ ဆိုရင်တော့ Aggregation ကို အသုံးပြုနိုင်ပါတယ်။
Reflexive Association
Relationship ဟာ same class မှာလည်း အခြင်းခြင်း ဖြစ်နိုင်ပါတယ်။ ဥပမာ ဝန်ထမ်း တွေ အောက်ပါ ဝန်ထမ်းတွေ ရှိနိုင်ပါသေးတယ်။
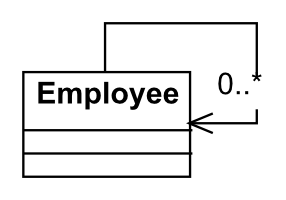
Code အရ ဆိုရင်
class Employee {
    List<Employee> subordinates;
}
Association Classes
တစ်ခါတစ်လေ class နှစ်ခု ကြားက relation က အခြား class တစ်ခု နဲ့ ချိတ်ဆက်ထားတာ မျိုးရှိပါတယ်။

Student နဲ့ Course က relation ကို Transcripts ကနေ တစ်ဆင့် ရှိပါတယ်။ Code ကို ကြည့်ရအောင်။
class Student {
    Set<Transcript> transcripts = new HashSet<>();
}

class Course {
    Set<Transcript> transcripts = new HashSet<>();
}

class Transcript {
    Student student;
    Course course;
    Date subscriptionDate;

    public Transcript(Student student, Course course, Date subscriptionDate) {
        this.student = student;
        this.course = course;
        this.subscriptionDate = subscriptionDate;
        student.transcripts.add(this);
        course.transcripts.add(this);
    }

    public Course getCourse() {
        return this.course;
    }
}
Dependency
Dependency က တော့ Class တစ်ခုက တစ်ခြား Class တစ်ခုပေါ်မှာ depend လုပ်ထားပါတယ်။ ဥပမာ CoffeeApp က CoffeeMachine ပေါ်မှာ depend ဖြစ်ပါတယ်။ ဒါပေမယ့် CoffeeApp က ကြိုက်သည့် CoffeeMachine ကို ပြောင်းသုံးလို့ရတယ်။ Associate နဲ့ မတူတောကတော့ သူက strong relation မရှိပါဘူး။ တစ်ခြားဟာ တစ်ခု ပြောင်းသုံးပြီးလည်း class က အသုံးပြုလို့ရနေသေးတာပါ။ ဥပမာ
public class CalculateClass {
    public double calculateSquareRoot(double number) {
        return Math.sqrt(number);
    }

    public double calculatePower(double base, double exponent) {
        return Math.pow(base, exponent);
    }
}
CalculateClass က Math class အပေါ်မှာ dependency ရှိနေတာပါ။

Inheritance
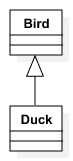
UML class diagram မှာ inheritance တွေကို အောက်ကလို မျိုး တြိဂံ ပုံ နဲ့ ဖော်ပြပါတယ်။
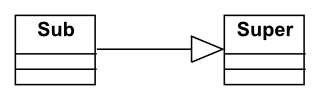
Code နဲ့ တွဲ ကြည့်ရအောင်။
public class Bird {
}
public class Duck extends Bird {
}
အထက်ပါ class လိုမျိုးကို အောက်ကလို diagram ဆွဲနိုင်ပါတယ်။
Inheritance ကို သုံးသည့် နေရာတွေ အများကြီး တွေ့နိုင်ပါတယ်။ Manager is Employee ဆိုသည့် relationship တွေ ရှိသည့် နေရာတွေမှာ Inheritance ကို အသုံးပြုနိုင်ပါတယ်။
သတိထားရမှာက Relationship မရှိရင် Inheritance မသုံးသင့်ပါဘူး။
ဥပမာ။ ။ Car နဲ့ Bicycle လိုမျိုးပေါ့။ ကားမှာလည်း gear ပါတယ်။ Biycle မှာလည်း gear ပါတယ်။ Car မှာလည်း အရောင်ပါတယ်။ model ပါတယ်။ Bicycle လည်း အတူတူပဲ။ properties တွေ တူသလို အချို့ basic function တွေလည်း တူတယ် ဆိုပြီး Inheritance ကို အသုံးပြုလို့ မဖြစ်ပါဘူး။
နောက်ပြီးတော့ Code Reuse တစ်ခု တည်း အတွက်လည်း မသုံးသင့်ပါဘူး။ Relationship မရှိသည့် School , Professor, Student မှာ ပါသည့် properties တွေ တူတယ် ဆိုပြီး Nameable class ဆိုပြီး ခွဲမထုတ်သင့်ပါဘူး။
Composition
Class နှစ် ခု က IS-A Relation မရှိဘူး။ ဒါပေမယ့် တစ်ခု class နှစ်ခု လုံးက လိုအပ်တယ်။ အဲဒီလို case တွေကို Inheritance အစား compositon ပြောင်းသုံးသင့်ပါတယ်။
ဥပမာ အောက်ပါ class ကို ကြည့်ပါ။

ဒီမှာ ဆိုရင် Person ဆိုသည့် class ကို Inheritance ကို အသုံးပြုထားတာ တွေ့နိုင်ပါတယ်။ တကယ်တန်းက Staff, Student, Professor တို့ဟာ Person ဖြစ်ပေမယ့် Role ပဲ မတူညီကြတာပါ။ Class diagram တွေကို Person ကို Inheritance သုံးမယ့် အစား Composition ပြောင်းသုံးတာ ပိုအဆင်ပြေပါလိမ့်မယ်။
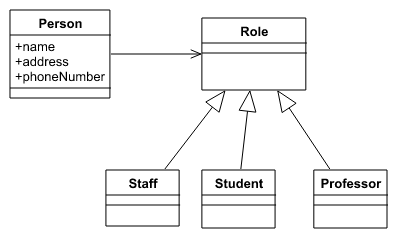
Person object က Role ကို Composition အနေနဲ့ သုံးထားတယ်။ Staff, Student, Professor က Role ကို Inheritance လုပ်ထားတယ်။ ဒါကြောင့် Person နဲ့ Role နဲ့ ကွဲသွားပါတယ်။
public class Person {
    private String name;
    private String address;
    private String phoneNumber;
    private Role role; // Reference to Role

    // getters and setters
}

public abstract class Role {
    // Role specific attributes and methods
}

public class Staff extends Role {
    // Staff specific attributes and methods
}

public class Student extends Role {
    // Student specific attributes and methods
}

public class Professor extends Role {
    // Professor specific attributes and methods
}
Abstract and Interface
OOP မှာ abstract နဲ့ Interface က အရေးကြီးပါတယ်။ အကြမ်းအားဖြင့် abstract နဲ့ interface ကွာခြားချက်ကတော့ abstract က abstract data တွေ အပြင် function တွေပါ ထည့်သွင်းရေးသားနိုင်ပါတယ်။ interface က declration အတွက်ပဲ အသုံးပြုနိုင်ပါတယ်။ ဘယ်အချိန်မှာ abstract, ဘယ် အချိန်မှာ interface တွေ သုံးသင့်သလဲ ဆိုတာကို design pattern ကို လေ့လာသည့် အခါမှာ တွေ့ရပါလိမ့်မယ်။
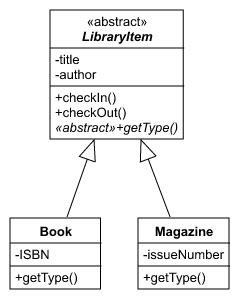
ဒီ Diagram မှာ ဆိုရင် abstract class ကို သုံးထားပါတယ်။ checkIn နဲ့ checkOut က LibraryItem ထဲမှာ အလုပ်လုပ်မှာ ဖြစ်ပြီး getType ကတော့ abstract function ဖြစ်သည့် အတွက် Book နဲ့ Magazine မှာ တွေ့နိုင်ပါတယ််။ Abstract ရဲ့ connection က Inheritance နဲ့ အတူတူပါပဲ။ Code အနေနဲ့ ကြည့်ရအောင်။
public abstract class LibraryItem {
    private String title;
    private String author;
    private boolean checkOut;

    public abstract String getType();
}

public class Book extends LibraryItem {
    private String ISBN;

    @Override
    public String getType() {
        return "Book";
    }
}

public class Magazine extends LibraryItem {
    private int issueNumber;

    @Override
    public String getType() {
        return "Magazine";
    }
}
Interface ကို ကြည့်ရအောင်။

interface ရဲ့ connection က inheritance နဲ့ မတူပဲ နည်းနည်း ကွာပါတယ်။ dotted ကို သုံးပြီး ရေးဆွဲထားပါတယ်။ ဒီ diagram မှာ Duck က Flyable, Swimable ကို သုံးထားပြီး Penguin ကတော့ Swimable ကိုပဲ အသုံးပြုထားတာကို တွေ့နိုင်ပါတယ်။ Interface က inheritance နဲ့ မတူတာက multiple implement လုပ်လို့ရပါတယ်။ Code ကို ကြည့်ရအောင်။
public interface Flyable {
    void fly();
}

public interface Swimable {
    void swim();
}

public class Duck implements Flyable, Swimable {
    @Override
    public void fly() {
        // Implement fly behavior for Duck
    }

    @Override
    public void swim() {
        // Implement swim behavior for Duck
    }
}

public class Penguin implements Swimable {
    @Override
    public void swim() {
        // Implement swim behavior for Penguin
    }
}
Exercise
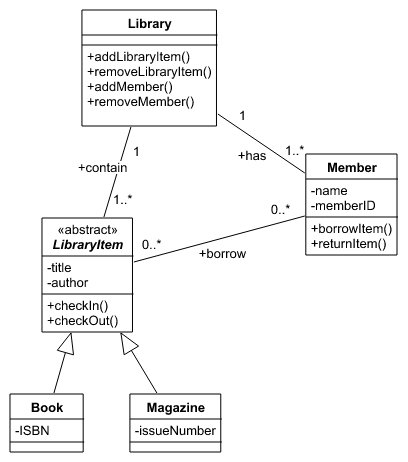
Library System တစ်ခုကို UML နဲ့ class diagram ဆွဲကြည့်ပါ။ တစ်ယောက် နဲ့ တစ်ယောက် တူမှာ မဟုတ်ပေမယ့် ကောင်းမွန်သည့် အလေ့အကျင့် တစ်ခု ရှိအောင် ဆွဲကြည့်ပါ။
ကျွန်တော် အကြမ်း ဆွဲထားသည့် design ကတော့ အောက်ပါ အတိုင်း ဖြစ်ပါတယ်။
Design Pattern မိတ်ဆက်
Pattern ဆိုတာက ထပ်ခါ ထပ်ခါ ဖြစ်နေသည့် သဘောမျိုးကို ဆိုလိုတာပါ။ Design Pattern ဆိုတာကလည်း တူညီသည့် ပြဿနာတွေ ကို စုစည်းပြီး ဖြေရှင်း နည်း ကို ထုတ်ထားပေးသည့် သဘောမျိုးပါပဲ။ Application တွေ System တွေကို တည်ဆောက်သည့် အခါမှာ System Design ကို ဦးစွာ တည်ဆောက်ရပါတယ်။ Blue Print မရှိပဲ တည်ဆောက်သည့် အခါမှာ အများတွေ များလာနိုင်ပါတယ်။ System တစ်ခုက သေချာစွာတည် ဆောက်ထားမှု မရှိရင် အသစ်တွေ ထပ်ဖြည့်သည့် အခါမှာ ပြဿနာ တွေ အများကြီး ရှိနိုင်ပါတယ်။
Design Pattern အသေးစိတ် လေ့လာမယ် ဆိုရင် GoF: Gang Of Four ရဲ့ Design Pattern စာအုပ်ကို အားရင် ဖတ်သင့်ပါတယ်။ Design Pattern အားလုံးပါဝင်ပြီးတော့ 1994 က ထုတ်ထားတာပါ။ သို့ပေမယ့် အခု ထက်ထိ အသုံးဝင်နေဆဲပါပဲ။

Software Development မှာ Patterns တွေ အများကြီး ရှိပါတယ်။ အချို့တွေက Design Pattern ကို MVVM, MVC လိုမျိုး design structure တွေ နဲ့ မှားတတ်ပါတယ်။ ဒီစာအုပ် မှာတော့ Facade, Command, Strategy လိုမျိုး design pattern တွေကို လေ့လာရမှာ ဖြစ်ပါတယ်။
ဘယ်သူ တွေ ဖတ်သင့်သလဲ
Design Pattern ကို မလေ့လာခင်မှာ ဦးစွာ
- Object Oriented Programming (OOP)
- SOLID Principle
- UML Class Diagram
- လုပ်ငန်း အတွေ့အကြုံ
တို့ လိုအပ် ပါတယ်။ OOP , UML , SOLID တို့ ကို စာတွေ့ မဟုတ်ပဲ လုပ်ငန်း အတွေ့အကြုံ နဲ့ လက်တွေ့ သိရှိ ထားမှသာ Design Pattern ပိုင်းကို နားလည် ဖို ့လွယ်ကူမှာပါ။ တစ်ခုခု အားနည်းခဲ့ရင်တော့ စာဖတ်လိုက်လို့ သိသွားသည့် သဘောပဲ ရှိပါမယ်။ နားလည်သဘောပေါက် သွားဖို့ အချိန် ပေးရမှာပါ။
Design Pattern အမျိုးအစား
Design Pattern မှာ
- Creational Patterns
- Structural Patterns
- Behavioral Patterns
ဆိုပြီး ရှိပါတယ်။
တစ်ခုခု ကို ဖန်တီးထုတ်လုပ် ခဲ့ရင် Creational Patterns သဘောဖြစ်ပြီး Class Structural တစ်ခုကို ပြောင်းလဲ ရင်တေော့ Structural Patterns ပါ။ Class ရဲ့ Behavioral ပေါ်မှာ မူတည်ပြီး ပြောင်းလဲရင်တော့ Behavioral Patterns ဆိုတာကို တွေ့ရပါလိမ့်မယ်။
Facade Pattern
Facade Pattern က Structural-Pattern တစ်ခု ဖြစ်ပါတယ်။ သူက တံခါးပေါက်နဲ့ တူပါတယ်။ System အကြီးရဲ့ အောက်မှာ sub system တွေ ရှိနေပြီး သူတို့ကို Service Class ကနေ တဆင့်ခိုင်းစေတာပါ။
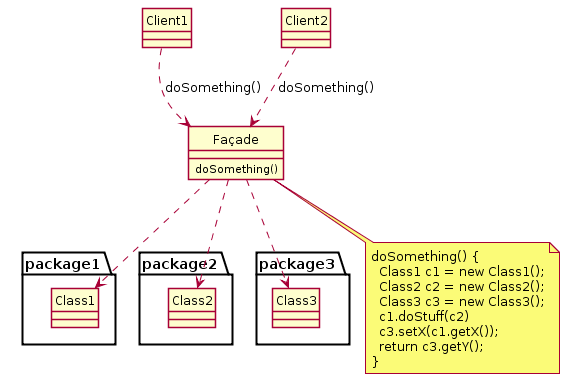
သူ့ class diagram မှာ Facade နဲ့ Client ပါဝင်ပါတယ်။
Client က နေ တစ်ခုခု ကို Facade ကို ခိုင်းလိုက်ပါတယ်။ Facade က သက်ဆိုင်ရာ class တွေကို ခိုင်းပြီး အလုပ်လုပ်သွားသည့် သဘောပါ။
ဥပမာ နားလည်အောင် အောက်က Diagram ကို ကြည့်ကြည့်ပါ။
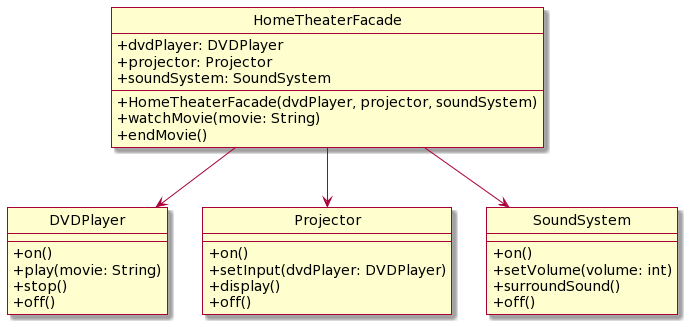
HomeTheaterFacade က main system ဖြစ်ပြီး သူ့ဆီမှာ sub system တွေ ဖြစ်သည့် DVD Player, Projector, Sound System တွေ ရှိနေပါတယ်။
ကျွန်တော်တို့ ဘယ် DVD Player သုံးမယ်။ ဘယ် Projector သုံးမယ်။ ဘယ် Sound System သုံးမယ် ဆိုတာကို HomeTheaterFacade မှာ initalize လုပ်ပေးပြီး watchMovie ဆိုရင် sub system တွေ အကုန်လုံး အလုပ်လုပ်မှာပါ။ အဲဒီ အတိုင်း endMovie ဆိုရင် sub system တွေ အကုန် ရပ်သွားမှာပါ။
Java code နဲ့ တချက်ကြည့်ရအောင်။
DVDPlayer.java
public class DVDPlayer {
    public void on() {
        System.out.println("DVD Player is ON");
    }

    public void play(String movie) {
        System.out.println("Playing " + movie);
    }

    public void stop() {
        System.out.println("DVD Player stopped");
    }

    public void off() {
        System.out.println("DVD Player is OFF");
    }
}
Projector.java
public class Projector {
    public void on() {
        System.out.println("Projector is ON");
    }

    public void setInput(DVDPlayer dvdPlayer) {
        System.out.println("Setting input to DVD Player");
    }

    public void display() {
        System.out.println("Projector is displaying");
    }

    public void off() {
        System.out.println("Projector is OFF");
    }
}
SoundSystem.java
public class SoundSystem {
    public void on() {
        System.out.println("Sound System is ON");
    }

    public void setVolume(int volume) {
        System.out.println("Setting volume to " + volume);
    }

    public void surroundSound() {
        System.out.println("Surround sound is ON");
    }

    public void off() {
        System.out.println("Sound System is OFF");
    }
}
HomeTheaterFacade.java
public class HomeTheaterFacade {
    private DVDPlayer dvdPlayer;
    private Projector projector;
    private SoundSystem soundSystem;

    public HomeTheaterFacade(DVDPlayer dvdPlayer, Projector projector, SoundSystem soundSystem) {
        this.dvdPlayer = dvdPlayer;
        this.projector = projector;
        this.soundSystem = soundSystem;
    }

    public void watchMovie(String movie) {
        System.out.println("Get ready to watch a movie...");
        dvdPlayer.on();
        dvdPlayer.play(movie);
        projector.on();
        projector.setInput(dvdPlayer);
        projector.display();
        soundSystem.on();
        soundSystem.setVolume(10);
        soundSystem.surroundSound();
    }

    public void endMovie() {
        System.out.println("Shutting down the movie theater...");
        dvdPlayer.stop();
        dvdPlayer.off();
        projector.off();
        soundSystem.off();
    }
}
အခု HomeTheaterFacade ကို ခေါ်သုံးပါမယ်။
public class Main {
    public static void main(String[] args) {
        // Create the subsystem components
        DVDPlayer dvdPlayer = new DVDPlayer();
        Projector projector = new Projector();
        SoundSystem soundSystem = new SoundSystem();

        // Create the facade
        HomeTheaterFacade homeTheaterFacade = new HomeTheaterFacade(dvdPlayer, projector, soundSystem);

        // Watch a movie using the Facade
        homeTheaterFacade.watchMovie("Avatar");

        // End the movie and shut down the system
        homeTheaterFacade.endMovie();
    }
}
နောက်ပြီး နေ့စဥ် သုံးနေကျ စနစ်တွေမှာဆိုရင်တော့ Facade က Service class နဲ့ တူပါတယ်။ သူကနေ တဆင့် database ကို CRUD တွေ အပြင် အခြား သက်ဆိုင်ရာ sub system တွေကို ခေါ်ပြီး အသုံးပြုပါတယ်။
User class ကို ကြည့်ရအောင်။
User.java
// User class representing the domain entity
class User {
    private String id;
    private String name;
    // Other user properties, getters, setters, etc.
}
UserRepository.java
// Data Access Layer
class UserRepository {
    public User saveUser(User user) {
        // Persist the user in the database and return the saved user
    }

    public User getUserById(String userId) {
        // Retrieve user from the database using the provided ID
    }

    public void deleteUser(String userId) {
        // Delete user from the database using the provided ID
    }
}
EmailService.java
// Integration Layer
class EmailService {
    public void sendWelcomeEmail(User user) {
        // Send a welcome email to the user
    }
}
UserManager.java
// Business Logic Layer
class UserManager {
    private UserRepository userRepository;
    private EmailService emailService;

    public UserManager(UserRepository userRepository, EmailService emailService) {
        this.userRepository = userRepository;
        this.emailService = emailService;
    }

    public User createUser(String name) {
        User newUser = new User();
        newUser.setName(name);

        // Save the user in the database
        User savedUser = userRepository.saveUser(newUser);

        // Send a welcome email to the user
        emailService.sendWelcomeEmail(savedUser);

        return savedUser;
    }

    public User getUserById(String userId) {
        return userRepository.getUserById(userId);
    }

    public void deleteUser(String userId) {
        userRepository.deleteUser(userId);
    }
}
UserManagementFacade.java
// Facade to provide a simplified interface to interact with different layers
class UserManagementFacade {
    private UserManager userManager;

    public UserManagementFacade() {
        UserRepository userRepository = new UserRepository();
        EmailService emailService = new EmailService();
        this.userManager = new UserManager(userRepository, emailService);
    }

    public User createUser(String name) {
        return userManager.createUser(name);
    }

    public User getUserById(String userId) {
        return userManager.getUserById(userId);
    }

    public void deleteUser(String userId) {
        userManager.deleteUser(userId);
    }
}
Main.java
// Presentation Layer (Main Application)
public class Main {
    public static void main(String[] args) {
        UserManagementFacade facade = new UserManagementFacade();

        // Create a new user
        User newUser = facade.createUser("John Doe");
        System.out.println("User created with ID: " + newUser.getId());

        // Get a user by ID
        String userId = newUser.getId();
        User retrievedUser = facade.getUserById(userId);
        System.out.println("User retrieved: " + retrievedUser.getName());

        // Delete the user
        facade.deleteUser(userId);
        System.out.println("User with ID " + userId + " deleted.");
    }
}
UserManagementFacade က ရိုးရှင်း ပုံစံ ရှိပြီးတော့ UserManager က အနည်းငယ် ရှုပ်ထွေးပါတယ်။ UserRepository, EmailService ကို အသုံးပြုသူက တည်ဆောက်ဖို့ မလိုပဲ UserManagementFacade က တည်ဆောက်ပေးပြီး User တွေကို create, get, delete လုပ်သည့် အခါမှာ ရိုးရှင်း လွယ်ကူစေပါတယ်။
Sequence Diagram ကို ကြည့်လိုက် သည့် အခါမှာ ပိုရှင်းလင်း ပြီး သဘောပေါက်ပါလိမ့်မယ်။

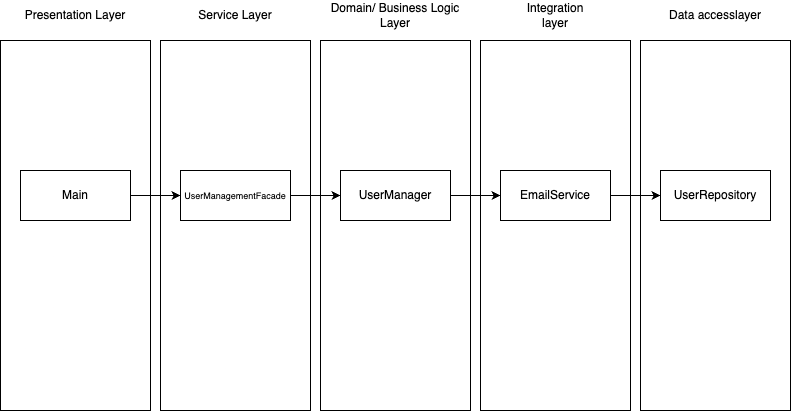
Application Layer
Software System တစ်ခု မှာ ရှိသည့် layer တွေ အရ Facade pattern ဟာ service layer မှာ ရှိပါတယ်။ Layer တွေကို ခွဲထုတ်ရေးရတာကလည်း Single Responsiblity ဖြစ်ချင်လို့ပါ။
- Presentation Layer
- Service Layer
- Business Logic Layer
- Integration Layer
- Data Access Layer
Pros and Cons
ကောင်းချက်ကတော့ complex ဖြစ်သည့် subsystem က code တွေကို isolate လုပ်ထားနိုင်ပါတယ်။ Facades pattern ဟာ unit testing နဲ့ integration testing တွေ အတွက် အဆင်ပြေပါတယ်။
မကောင်းတာကတော့ facade က a god object ဖြစ်နေလို့ပါပဲ။ သူကနေ အကုန်လုံးကို ထိန်းချုပ်ထားသည့် သဘောမျိုးပါ။
Command Pattern
Command pattern က behavioral design pattern တစ်ခုပါ။

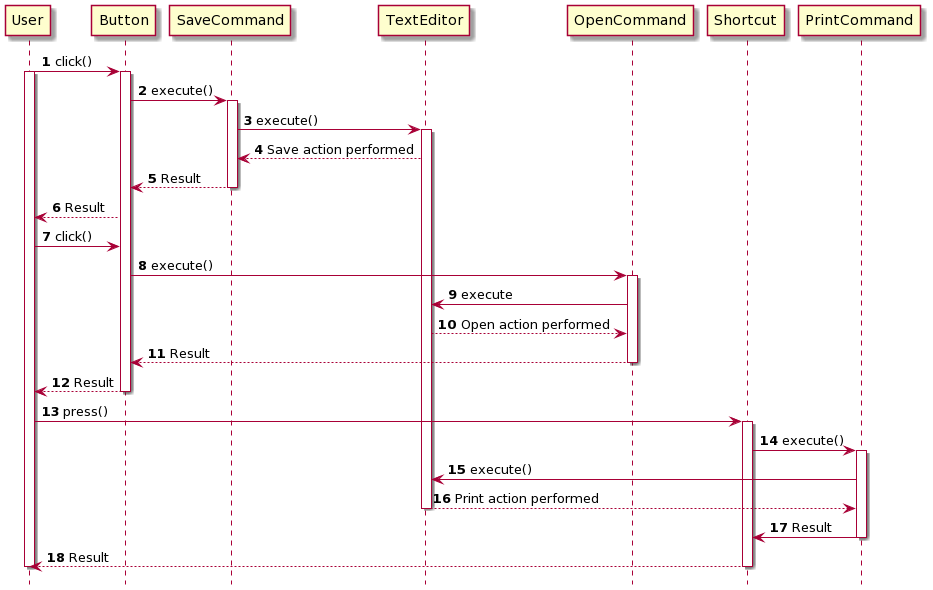
Invoker က action တစ်ခု လုပ်လိုက်သည့် အခါမှာ သက်ဆိုင်ရာ command က receiver ရဲ့ action ကို သွားပြီး ခိုင်းမှာပါ။ ဥပမာ Text-Editor app တစ်ခု ဖန်တီးသည့် အခါမှာ toolbar မှာ buttons တွေ အများကြီး ရှိပါလိမ့်မယ်။ Copy, Paste, Undo, Redo စသည့် button တွေ အများကြီး ရှိပါတယ်။ Save လုပ်ဖို့ အတွက် Button ကနေ ရှိနိုင်တယ်။ Menu ကနေ ရှိနိုင်တယ်။ Shortcut ကနေလည်း ရှိနိုင်ပါတယ်။ Button တစ်ခု ဆီကနေ function ခေါ်မယ့် စား SaveCommand ဆိုပြီး command pattern နဲ့ ရေးတာ ပိုအဆင်ပြေပါမယ်။
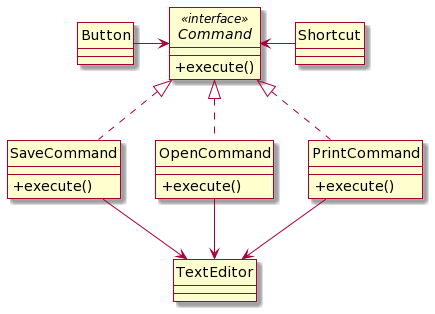
ပုံမှာ ဆိုရင် Button နဲ့ Shortcut က Command Interface ကနေ တဆင့် execute လုပ်တော့မယ့် အပိုင်းပဲ ရှိပါတော့တယ်။ Command တိုင်းမှာ execute function ပါပြီး သက်ဆိုင်ရာ Function ကို execute လုပ်သွားမှာပါ။
Java code ကို ကြည့်ရအောင်။
Command.java
public interface Command {
    void execute();
}
SaveCommand.java
public class SaveCommand implements Command {
    private TextEditor textEditor;

    public SaveCommand(TextEditor textEditor) {
        this.textEditor = textEditor;
    }

    @Override
    public void execute() {
        textEditor.save();
    }
}
OpenCommand.java
public class OpenCommand implements Command {
    private TextEditor textEditor;

    public OpenCommand(TextEditor textEditor) {
        this.textEditor = textEditor;
    }

    @Override
    public void execute() {
        textEditor.open();
    }
}
PrintCommand.java
public class PrintCommand implements Command {
    private TextEditor textEditor;

    public PrintCommand(TextEditor textEditor) {
        this.textEditor = textEditor;
    }

    @Override
    public void execute() {
        textEditor.print();
    }
}
TextEditor.java
public class TextEditor {
    public void save() {
        System.out.println("Saving the document.");
        // Save implementation here
    }

    public void open() {
        System.out.println("Opening a document.");
        // Open implementation here
    }

    public void print() {
        System.out.println("Printing the document.");
        // Print implementation here
    }
}
Button.java
public class Button {
    private Command command;

    public Button(Command command) {
        this.command = command;
    }

    public void click() {
        command.execute();
    }
}
Shortcut.java
public class Shortcut {
    private Command command;

    public Shortcut(Command command) {
        this.command = command;
    }

    public void press() {
        command.execute();
    }
}
Client.java
public class Client {
    public static void main(String[] args) {
        TextEditor textEditor = new TextEditor();

        // Create command objects and associate them with the receiver
        Command saveCommand = new SaveCommand(textEditor);
        Command openCommand = new OpenCommand(textEditor);
        Command printCommand = new PrintCommand(textEditor);

        // Create sender objects (buttons or shortcuts)
        Button saveButton = new Button(saveCommand);
        Button openButton = new Button(openCommand);
        Shortcut printShortcut = new Shortcut(printCommand);

        // Simulate the user clicking the buttons or using shortcuts
        saveButton.click();
        openButton.click();
        printShortcut.press();
    }
}
ဒီ Code လေးကို ကြည့်လိုက်ရင် သဘောပေါက်လွယ်မှာပါ။
Command Pattern မှာ
- Invoker
- Command
- Concrete Command
- Receiver
ဆိုပြီး ရှိပါတယ်။
Button, Shortcut တို့က Invoker ပါ။ သူတို့က command ကို invoke လုပ်မယ့်သူတွေပါ။ Command interface ကတော့ Command ဖြစ်ပြီး execute လုပ်မယ့် အပိုင်းပဲ ပါဝင်ပါတယ်။ SaveCommand, PrintCommand, OpenCommand တွေကတော့ Concrete Command ပါ။ TextEditor ကတော့ Receiver ပါ။ Command တွေက Receiver ရဲ့ operation တွေကို လှမ်းခေါ်မှာပါ။
Command Pattern with History
Command Pattern က Undo/Redo လုပ်ချင်သည့် pattern တွေမှာလည်း အသုံးပြုနိုင်ပါတယ်။ Command Pattern ဟာ command history တွေကို stack ထဲထည့်ပြီး ပြန်ထုတ်သည့် အခါမှာ Undo/Redo တွေ ဖန်တီးလို့ရပါပြီ။
ဥပမာ stack ကို ကြည့်ရအောင်။ Push နဲ့ Pop ပါမယ်။
- Push ကို undo လုပ်ရင် pop ဖြစ်ပြီး redo ပြန်လုပ်ရင် push ပြန်ဖြစ်မယ်။
- Pop ကို undo လုပ်ရင် push ဖြစ်ပြီး redo ပြန်လုပ်ရင် pop ဖြစ်ပါမယ်။
Class Diagram ကို ကြည့်ရအောင်။

လုပ်ဆောင်မည့်ပုံကို sequence diagram ကို ကြည့်ပြီး သိနိုင်ပါတယ်။

Sequence Diagram မှာ Push Command ကို create လုပ်လိုက်တယ်။ပြီးရင် Application ကနေ တဆင့် History List ထဲကို ထည့်သွားတာ တွေ့နိုင်ပါတယ်။ Pop Command လည်း ထိုနည်း တူပါပဲ။ Undo လုပ်သည့် အခါမှာ PopCommand ရဲ့ unexecute ကို ခေါ်သွားပြီး redo လုပ်သည့် အခါမှာ PopCommand ရဲ့ execute ကို ပြန်ခေါ်သွားပါတယ်။
Code အပိုင်း ကို စဥ်းစားကြည့်ရအောင်။
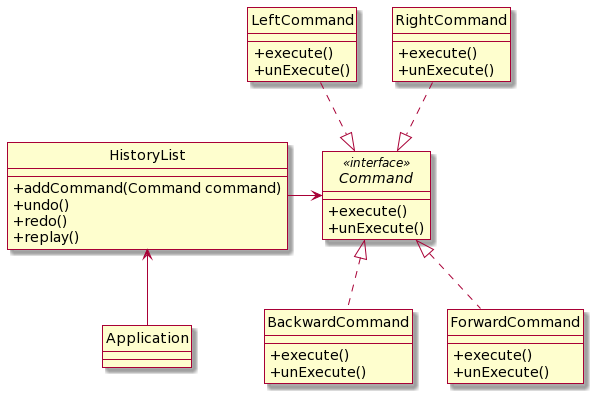
HistoryList မှာ Undo နဲ့ Redo အတွက် ArrayList ၂ ခု ရှိဖို့ လိုပါတယ်။ ဒါမှသာ undo နှင့် redo ပြန်လုပ်လို့ရမှာပါ။ Code အစ အဆုံး ကို လေ့လာကြည့်ရအောင်။
Command.java
public interface Command {
    void execute();
    void unExecute();
}
PushCommand.java
public class PushCommand implements Command{
    Stack<Integer> stack;
    Integer i;

    public PushCommand(Stack<Integer> stack, Integer i) {
        this.stack = stack;
        this.i = i;
    }

    public void execute(){
        stack.push(i);
    }

    public void unExecute(){
        stack.pop();
    }
}
PopCommand.java
public class PopCommand implements Command{
    Stack<Integer> stack;
    Integer i;

    public PopCommand(Stack<Integer> stack) {
        this.stack = stack;
    }

    public void execute(){
        i = stack.isEmpty() ? null : stack.pop();
    }

    public void unExecute(){
        if (i != null) {
            stack.push(i);
        }
    }
}
HistoryList.java
public class HistoryList {
    private List<Command> commandList = new ArrayList<>();
    private List<Command> undoList = new ArrayList<>();

    public void undo() {
        if (!commandList.isEmpty()) {
            Command commandObject = commandList.remove(commandList.size() - 1);
            commandObject.unExecute();
            undoList.add(commandObject);
        }
    }

    public void redo() {
        if (!undoList.isEmpty()) {
            Command commandObject = undoList.remove(undoList.size() - 1);
            commandObject.execute();
            commandList.add(commandObject);
        }
    }

    public void addCommand(Command commandObject) {
        commandList.add(commandObject);
    }
}
Application.java
public class Application {

    public static void main(String[] args) {
        Stack<Integer> stack = new Stack<>();
        HistoryList hlist = new HistoryList();

        PushCommand pushc1 = new PushCommand(stack, 6);
        pushc1.execute();
        hlist.addCommand(pushc1);
        System.out.println(stack);

        PushCommand pushc2 = new PushCommand(stack, 3);
        pushc2.execute();
        hlist.addCommand(pushc2);
        System.out.println(stack);

        PopCommand popc1 = new PopCommand(stack);
        popc1.execute();
        hlist.addCommand(popc1);
        System.out.println(stack);

        hlist.undo();
        System.out.println(stack);
    }
}
Replay
Command Pattern ကို reply အနေနဲ့လည်း အသုံးပြုလို့ရပါတယ်။ ဥပမာ Game တစ်ခု မှာ သွားခဲ့သည့် command တွေကို reply ပြန်ပြချင်တယ် ဆိုရင် Command Pattern ကို အသုံးပြုနိုင်ပါတယ်။ History class မှာ undo, redo အပြင် replay ပါ ပါလာသည့် အတွက် ရေးသားရသည့် ပုံစံ ပြောင်းသွားပါတယ်။
ဥပမာ
- Forward()
- Forward()
- Left()
- Forward()
- Right()
- Backward()
ကို reply ပြန်လုပ်ရ command တွေကို အစ ကနေ ပြန် run ပေးရမှာပါ။ Undo, Redo နဲ့ ဖြေရှင်းလို့ မရတော့ပါဘူး။
ဒီတော့ လက်ရှိရှိ နေသည့် history class မှာ ရှိသည့် ့Array ကို reply ပြန်လုပ်သည့် အခါမှာ အခန်း သုည က နေ စပြီး ပြန် ခေါ်ပေးဖို့ လိုပါတယ်။
Class Diagram ကို ကြည့်ရအောင်။
Sequence Diagram အရဆိုရင်
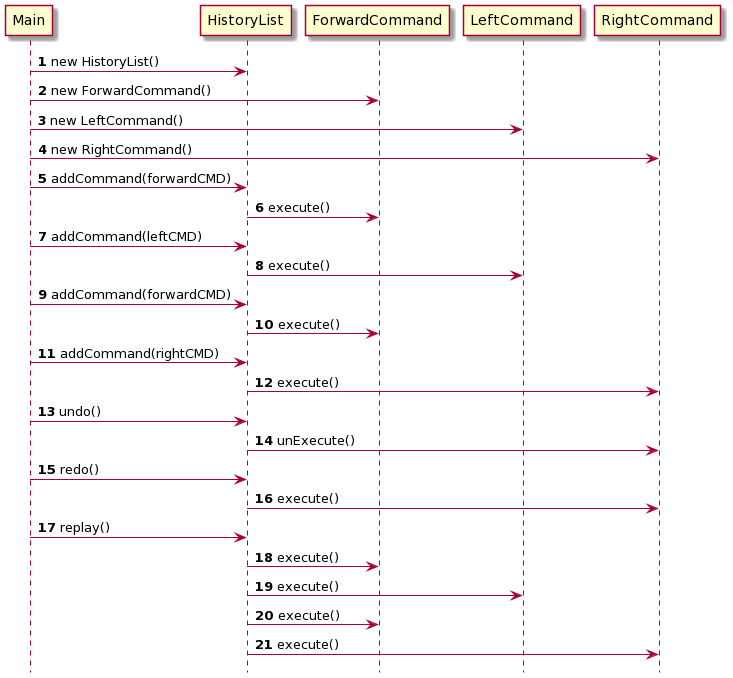
Sequence diagram ကြည့်ပြီးရင် code ကို ပြန်ရေးလို့ရပါပြီ။
Command.java
// Command interface
interface Command {
    void execute();
    void unExecute();
}
ForwardCommand.java
// Concrete commands
class ForwardCommand implements Command {
    public void execute() {
        System.out.println("forward");
    }
    public void unExecute() {
        System.out.println("undo forward");
    }
}
BackwardCommand.java
class BackwardCommand implements Command {
    public void execute() {
        System.out.println("backward");
    }
    public void unExecute() {
        System.out.println("undo backward");
    }
}
LeftCommand.java
class LeftCommand implements Command {
    public void execute() {
        System.out.println("left");
    }
    public void unExecute() {
        System.out.println("undo left");
    }
}
RightCommand.java
class RightCommand implements Command {
    public void execute() {
        System.out.println("right");
    }
    public void unExecute() {
        System.out.println("undo right");
    }
}
HistoryList.java
// HistoryList class
class HistoryList {
    private List<Command> commands = new ArrayList<>();
    private int current = 0;

    public void addCommand(Command command) {
        commands.add(command);
        command.execute();
        current++;
    }

    public void undo() {
        if (current > 0) {
            commands.get(--current).unExecute();
        }
    }

    public void redo() {
        if (current < commands.size()) {
            commands.get(current++).execute();
        }
    }

    public void replay() {
        for (Command command : commands) {
            command.execute();
        }
    }
}
Main.java
// Usage
public class Main {
    public static void main(String[] args) {
        HistoryList history = new HistoryList();
        Command forwardCMD = new ForwardCommand();
        Command backwardCMD = new BackwardCommand();
        Command leftCMD = new LeftCommand();
        Command rightCMD = new RightCommand();

        history.addCommand(forwardCMD);
        history.addCommand(leftCMD);
        history.addCommand(forwardCMD);
        history.addCommand(rightCMD);

        history.undo();  // Outputs: undo right
        history.redo();  // Outputs: right
        history.replay();  // Outputs: forward, left, forward, right
    }
}
Pros and Cons
ကောင်းတာတွေကတော့
- Single Responsibility Principle ကို လိုက်နာ ထားတယ်။
- Open/Close Principle ကိုလည်း လိုက်နာ ပါတယ်။
- Complex ဖြစ်သည့် system အတွက် ရိုးရှင်း Commands တွေ စုစည်းပြီး ရေးသားနိုင်ပါတယ်။ ဥပမာ TextEditor ရဲ့ Toolbar button တွေလိုမျိုးပေါ့။
မကောင်းတာကတော့
- Code က ပိုပြီး complicated ဖြစ်သွားနိုင်တယ်။ Sender နဲ့ Receiver ကြားမှာ နောက်ထပ် layer တစ်ခု ပါလာသလို ဖြစ်သွားတာပါ။
Strategy Pattern
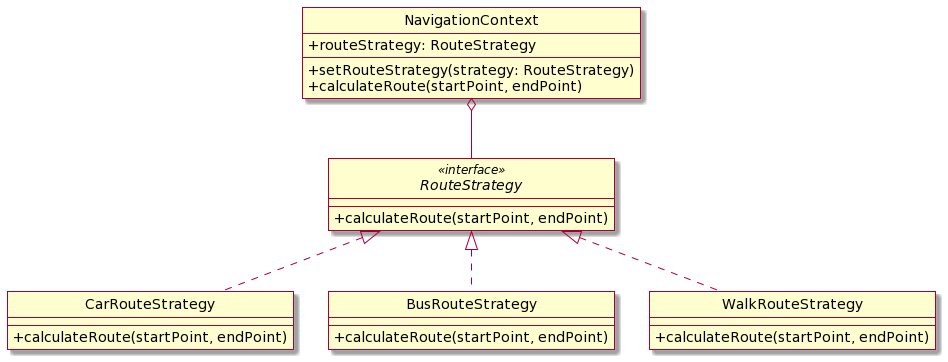
Strategy pattern က behavioral design pattern တစ်ခုပါ။ Strategy Pattern အကြောင်းပြောရရင် ပြဿနာ တစ်ခု ကို ဖြေရှင်းဖို့ အတွက် နည်းလမ်း မျိုးစုံ ရှိပါတယ်။ အဲဒီ နည်းလမ်းထဲက ဘယ် နည်းလမ်း နဲ့ ရှင်းမလဲ ဆိုတာကို ပြောပြပေးလိုက်တာပါပဲ။
ဥပမာ Google Map မှာ Point A ကနေ Point B ကို သွားမယ်။ အဲဒီ အခါမှာ သွားဖို့ Strategy တွေက
- ကား နဲ့ သွားမယ်
- လမ်းလျှောက် သွားမယ်
- bus နဲ့ သွားမယ်
ဆိုပြီး strategy ရှိလာပါတယ်။ Strategy ပေါ်မှာ မူတည်ပြီး Route ကို ဖန်တီး ပါတယ်။
Class Diagram ကို ကြည့်ရအောင်။
တကယ် အလုပ်လုပ်မည့် Sequence diagram ကို ကြည့်ရအောင်။
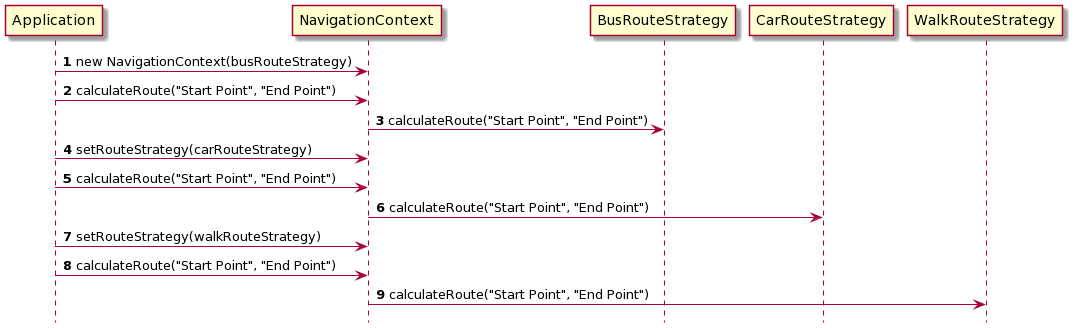
Sequence Diagram ကို မြင်သည့် အခါမှာ code ကို သဘောပေါက်ပါလိမ့်မယ်။
အခု Code ကို ကြည့်ရအောင်။
RouteStrategy.java
interface RouteStrategy {
    void calculateRoute(String startPoint, String endPoint);
}
CarRouteStrategy.java
class CarRouteStrategy implements RouteStrategy {
    @Override
    public void calculateRoute(String startPoint, String endPoint) {
        System.out.println("Calculating car route from " + startPoint + " to " + endPoint);
    }
}
BusRouteStrategy.java
class BusRouteStrategy implements RouteStrategy {
    @Override
    public void calculateRoute(String startPoint, String endPoint) {
        System.out.println("Calculating bus route from " + startPoint + " to " + endPoint);
    }
}
WalkRouteStrategy.java
class WalkRouteStrategy implements RouteStrategy {
    @Override
    public void calculateRoute(String startPoint, String endPoint) {
        System.out.println("Calculating walking route from " + startPoint + " to " + endPoint);
    }
}
**
NavigationContext.java**
class NavigationContext {

   private RouteStrategy routeStrategy;

   public NavigationContext(RouteStrategy routeStrategy){
       this.routeStrategy = routeStrategy;
   }

   public void setRouteStrategy(RouteStrategy strategy){
       this.routeStrategy = strategy;
   }

   public void calculateRoute(String startPoint, String endPoint){
       this.routeStrategy.calculateRoute(startPoint,endPoint);
   }
}
Application.java
public class Application {
    public static void main(String[] args) {
        // Create a new BusRouteStrategy
        RouteStrategy busRouteStrategy = new BusRouteStrategy();

        // Create a new NavigationContext and set the strategy to BusRouteStrategy
        NavigationContext navigationContext = new NavigationContext(busRouteStrategy);

        // Use the navigationContext to calculate a route
        navigationContext.calculateRoute("Start Point", "End Point");

        RouteStrategy carRouteStrategy = new CarRouteStrategy();
        navigationContext.setRouteStrategy(carRouteStrategy);
        navigationContext.calculateRoute("Start Point", "End Point");

        RouteStrategy walkRouteStrategy = new WalkRouteStrategy();
        navigationContext.setRouteStrategy(walkRouteStrategy);
        navigationContext.calculateRoute("Start Point", "End Point");

    }
}
Strategy Pattern ကို တခြား ဥပမာ အနေနဲ့ ပြောရရင် Array Sorting တွေကို strategy pattern နဲ့ ဘယ် sorting ကို သုံးမလဲ ဆိုတာကို ထည့်နိုင်ပါတယ်။

အခု ဆိုရင် class diagram ကြည့်တာနဲ့ code ဘယ်လို ရေးရမလဲ သဘောပေါက်ပြီလို့ ထင်ပါတယ်။
SortStrategy.java
// Strategy interface
interface SortStrategy {
    void sort(int[] array);
}
BubbleSort.java
// Concrete Strategy: BubbleSort
class BubbleSort implements SortStrategy {
    @Override
    public void sort(int[] array) {
        System.out.println("BubbleSort applied.");
    }
}
QuickSort.java
// Concrete Strategy: QuickSort
class QuickSort implements SortStrategy {
    @Override
    public void sort(int[] array) {
        System.out.println("QuickSort applied.");
    }
}
MergeSort.java
// Concrete Strategy: MergeSort
class MergeSort implements SortStrategy {
    @Override
    public void sort(int[] array) {
        System.out.println("MergeSort applied.");
    }
}
Products.java
// Context class
class Products {
    private int[] array;
    private SortStrategy sortStrategy;

    public Products(int[] array) {
        this.array = array;
    }

    public void setSortStrategy(SortStrategy sortStrategy) {
        this.sortStrategy = sortStrategy;
    }

    public void sort() {
        sortStrategy.sort(array);
    }

    public void display() {
        System.out.print("Sorted array: ");
        for (int num : array) {
            System.out.print(num + " ");
        }
        System.out.println();
    }
}
Main.java
public class Main {
    public static void main(String[] args) {
        int[] array = { 64, 34, 25, 12, 22, 11, 90 };

        Products products = new Products(array);

        // Sort using BubbleSort
        products.setSortStrategy(new BubbleSort());
        products.sort();
        products.display();

        // Sort using QuickSort
        products.setSortStrategy(new QuickSort());
        products.sort();
        products.display();

        // Sort using MergeSort
        products.setSortStrategy(new MergeSort());
        products.sort();
        products.display();
    }
}
Strategy Pattern ကို တော်တော်များများ မှာ အသုံးပြုတာကို တွေ့နိုင်တယ်။ ဥပမာ Sign In with Google, Sign In With Facebook တို့ ဆိုရင် strategy pattern နဲ့ ခွဲထုတ်ပြီး ရေးသားနိုင်ပါတယ်။
Pros and Cons
ကောင်းတာတွေကတော့
- Runtime မှာ သက်ဆိုင်ရာ algorithms ကို ပြောင်းလဲ အသုံးပြုနိုင်ပါတယ်။ ဥပမာ Bus Route, Car Route လိုမျိုးပေါ့။
- Open/Closed Principle ကိုလည်း follow လုပ်ထားပါတယ်။
မကောင်းတာကတော့
- Algorithm တွေ ပြောင်းဖို့ မလိုသည့် project တွေမှာ ဆိုရင် သုံးဖို့ မလိုအပ်ပါဘူး။
Template Method Pattern
Template ဆိုတာကတော့ ကျွန်တော်တို့တွေ ကြားနေကြပါ။ ပုံမှန် အားဖြင့် အရန်သင့်ရှိပြီးသားထဲကမှ လိုအပ်သည့် အပိုင်းလေးကိုပဲ ပြင်ပြီး သုံးတာပါ။ Template Method Pattern ကလည်း အဲလိုခပ်ဆင်ဆင်ပါပဲ။ Template Method Pattern က Behavioral Patterns တစ်ခုပါ။
အိမ်တစ်လုံး ဆောက်သည့် Class ကို ကြည့်ရအောင်။
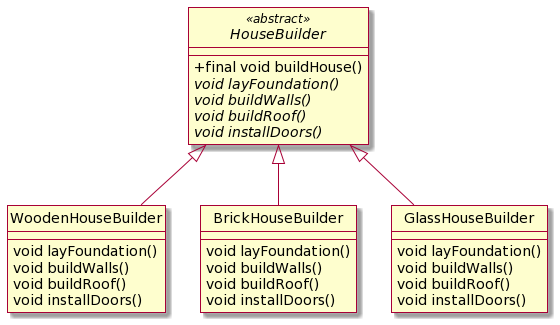
အိမ်ကို တစ်ဆောက်မှာကတော့ House Builder ကနေ buildHouse function က ပဲ ဆောက်ပါလိမ့်မယ်။ ဒါပေမယ့် ဆောက်ပုံဆောက်နည်း က class ပေါ်မှာ မူတည်ပြီး ကွာသွားတယ်။ Code ကို ကြည့်ရအောင်။
HouseBuilder.java
abstract class HouseBuilder {
    final void buildHouse() {
        layFoundation();
        buildWalls();
        buildRoof();
        installDoors();
    }

    abstract void layFoundation();
    abstract void buildWalls();
    abstract void buildRoof();
    abstract void installDoors();
}
WoodenHouseBuilder.java
class WoodenHouseBuilder extends HouseBuilder {
    void layFoundation() {
        System.out.println("Laying wooden foundation");
    }

    void buildWalls() {
        System.out.println("Building wooden walls");
    }

    void buildRoof() {
        System.out.println("Building wooden roof");
    }

    void installDoors() {
        System.out.println("Installing wooden doors");
    }
}
BrickHouseBuilder.java
class BrickHouseBuilder extends HouseBuilder {
    void layFoundation() {
        System.out.println("Laying brick foundation");
    }

    void buildWalls() {
        System.out.println("Building brick walls");
    }

    void buildRoof() {
        System.out.println("Building brick roof");
    }

    void installDoors() {
        System.out.println("Installing brick doors");
    }
}
GlassHouseBuilder.java
class GlassHouseBuilder extends HouseBuilder {
    void layFoundation() {
        System.out.println("Laying glass foundation");
    }

    void buildWalls() {
        System.out.println("Building glass walls");
    }

    void buildRoof() {
        System.out.println("Building glass roof");
    }

    void installDoors() {
        System.out.println("Installing glass doors");
    }
}
Main.java
public class MainApplication {
    public static void main(String[] args) {
        HouseBuilder woodenHouseBuilder = new WoodenHouseBuilder();
        woodenHouseBuilder.buildHouse();
    }
}
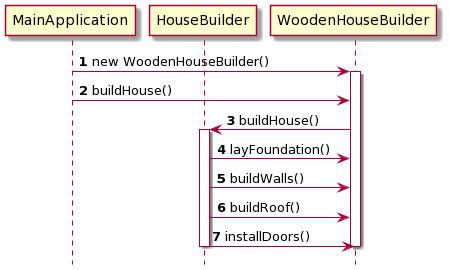
WoodenHouseBuilder အတွက် sequence diagram ကို ကြည့်လိုက်ရင် ရှင်းလင်းသွားပါလိမ့်မယ်။
Pros and Cons
Step တူပြီး Implemention မတူသည့် အခါမှာ template pattern ကို အသုံးပြုနိုင်ပါတယ်။ Code တွေကို ပိုလိုရှင်းလင်း စေပါတယ်။ နောက်ပြီး algorithm တစ်ခုကနေ နောက်တစ်ခုကို ပြောင်းလဲ နိုင်ပါတယ်။
Superclass က code ကိုလည်း ပြန်ပြီး အသုံးပြုနိုင်ပါတယ်။
မကောင်းတာကတော့ Liskov Substitution Principle ကို ချိုးဖောက်နိုင်ပါတယ်။ တချို့ sub class တွေက မလိုသည့် အဆင့်တွေ ပါလာနိုင်ပါတယ်။
step တွေ များလာလေလေ maintain လုပ်ဖို့ ခက်လေလေပါပဲ။
Observer Pattern
Observer Pattern က Mobile App Development တွေ လုပ်သည့် အခါမှာ မဖြစ်မနေသုံးနေကြ pattern တစ်ခုပါ။ MVVM (Model View View Model) ကို သုံးသည့် အခါမှာ observer pattern ကို အသုံးပြုပြီး ရေးကြတာတွေ ရှိပါတယ်။ Button က increase ကို နှိပ်လိုက်ရင် listen လုပ်ထားသည့် function က အလုပ်လုပ်ပြီး label ကို update လုပ်လိုက် သလိုမျိုးပေါ့။
Observer Pattern က Behavioral Patterns တစ်ခု ဖြစ်ပါတယ်။ အဓိက အပိုင်းကတော့ publisher နဲ့ subscriber ရှိတာပါပဲ။ Web Development ပိုင်းမှာ ဆိုရင် web socket က observer pattern ကို သုံးထားပါတယ်။ Publisher တစ်ခု ကနေ multiple subscriber ဆီ ကို notify လုပ်လို့ရပါတယ်။ Publish Subscribe pattern လို့လည်း ခေါ်ကြပါတယ်။
Observer Pattern မှာ Subject နဲ့ Observers ပါပါတယ်။
- Subject (Observable) ဆိုတာ က တော့ Observer Objects တွေကို သိမ်းထားပြီး changes ဖြစ်တိုင်း အဲဒီ object တွေကို notification ပို့ပေးတာပါ။ သူ့မှာ object ကို register လုပ်ဖို့ unregister လုပ်ဖို့ တွေ ရှိပါတယ်
- Observers ဆိုတာ က Subject က ပို့လိုက်သည့် notification ကို handle လုပ်ဖို့ အတွက်ပါ။ သူက interface ပါ။
- ConcreteObserver ဆိုတာ က တော့ Observers ရဲ့ interface ကို implement လုပ်ပြီး တကယ့် အလုပ်တွေ လုပ်မည့် class ပါ။
UML class diagram ကို ကြည့်ရအောင်။

အခု Event နဲ့ Event Source ပဲ ရှိသည့် sample code ကို ကြည့်ရအောင်။
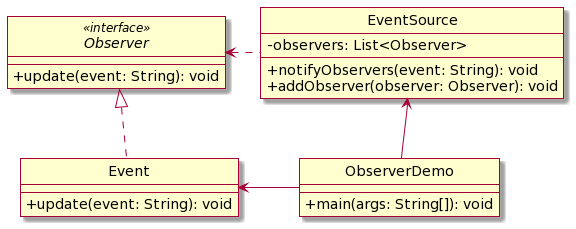
UML Diagram ကို မြင်သည့် အခါမှာ code ကို မြင်နိုင်ပါလိမ့်မယ်။ Java code အနေနဲ့ ကြည့်ကြည့်ရအောင်။
public interface Observer {
    void update(String event);
}

public class Event implements Observer {
    @Override
    public void update(String event) {
        // Implement the update method
    }
}

public class EventSource {
    private List<Observer> observers;

    public void notifyObservers(String event) {
        for (Observer observer : observers) {
            observer.update(event);
        }
    }

    public void addObserver(Observer observer) {
        observers.add(observer);
    }
}

public class ObserverDemo {
    public static void main(String[] args) {

        EventSource eventSource = new EventSource();

        Event event1 = new Event();
        Event event2 = new Event();
        eventSource.addObserver(event1);
        eventSource.addObserver(event2);

        eventSource.notifyObservers("Event occurred");
    }
}
Code ရဲ့ Sequence Diagram ကို ကြည့်ရအောင်။

ဒီ code သဘောတရားကို သဘောပေါက်ပြီ ဆိုရင် Scoreboard App ကို စဥ်းစားကြည့်ရအောင်။
public class Scoreboard {

    private int score;
    private List<Observer> observers = new ArrayList<>();

    public void setScore(int newScore) {
        score = newScore;
        notifyObservers();
    }

    @Override
    public void registerObserver(Observer observer) {
        observers.add(observer);
    }

    @Override
    public void unregisterObserver(Observer observer) {
        observers.remove(observer);
    }

    @Override
    public void notifyObservers() {
        for (Observer observer : observers) {
            observer.update(score);
        }
    }
}

public interface Observer {
    void update(int score);
}

public class PlayerScoreDisplay implements Observer {

    private Scoreboard scoreboard;

    @Override
    public void update(int score) {
        System.out.println("Player score: " + score);
    }
}
Observer Pattern က Listener တစ်ခု ထက် မက ရှိသည့် ကိစ္စတွေမှာ အဆင်ပြေပါတယ်။ ဥပမာ Score Board App မှာ Score Board ကို ပွဲရဲ့ နေရာ ၂ ခု မှာ ပြပေးမယ် , နောက်ပြီး Online အတွက်လည်း data ပို့ပေးရမယ် ဆိုရင် notify လုပ်လိုက်ရုံနဲ့ အကုန်လုံးမှာ update ဖြစ်သွားမှာ ဖြစ်ပါတယ်။
နောက်ပြီး Stock Value changes ဖြစ်တိုင်း notify လုပ်မယ့် program တွေကို observer pattern ကို အသုံးပြုပြီး ရေးသားနိုင်ပါတယ်။
Pros and Cons
Open/Closed Principle ကို follow လုပ်ထားပါတယ်။ Subscriber အသစ်ကို publisher က code မပြောင်းလဲပဲ update နိုင်ပါတယ်။
မကောင်းတာကတော့ subscriber က random order နဲ့ လာကောင်းလာနိုင်တယ်။ ဘယ် အဆင့်ပြီးမှ ဒီ function ရောက်ဆိုတာ မရှိပဲ notify လုပ်လိုက်တာနဲ့ subscriber ထဲကို ရောက်လာမှာပါ။
State Pattern
State Pattern ကတော့ Behaviour Pattern တစ်ခုပါ။ State Pattern ကတော့ strategy pattern နဲ့ တူသလို နဲ့ မှားတတ်ပါတယ်။ State Pattern ကတော့ strategy pattern လိုပါပဲ။ ဒါပေမယ့် သူက state တစ်ခု ကနေ တစ်ခု ပြောင်းလဲ သွားတာ ရှိပါတယ်။

မီးပွိုင့်တွေ မှာ ဆိုရင် ရှိသည့် state တွေက မီးရောင်က အနီ ၊ အဝါ၊ အစိမ်း ဆိုပြီး ရှိပါမယ်။ အနီ ပြီးရင် စိမ်းမယ်။ အစိမ်းပြီးရင် ဝါမယ်။ အဝါပြီးရင် အနီ ပြောင်းမယ်။ တနည်းပြောရင် state တစ်ခု ကနေ တစ်ခု ပြောင်းသွားသည့် သဘောပါပဲ။
ပုံမှန် ရေးမယ် ဆိုရင် if else condition တွေ နဲ့ ရေးရပါမယ်။
public class Main {
    static String currentState = "Red";

    public static void main(String[] args) {
        changeState();
        processFunction();
        System.out.println(currentState);
    }

    static void changeState() {
        if (currentState.equals("Red")) {
            currentState = "Green";
        } else if (currentState.equals("Green")) {
            currentState = "Yellow";
        } else if (currentState.equals("Yellow")) {
            currentState = "Red";
        }
    }

    static void processFunction() {
        if (currentState.equals("Red")) {
            System.out.println("Stop the car");
        } else if (currentState.equals("Green")) {
            System.out.println("Allow to go");
        } else if (currentState.equals("Yellow")) {
            System.out.println("Slow down");
        }
    }
}
အကယ်၍ State တွေ များလာပြီဆိုရင် If else conditoin တွေ များလာပါပြီ။ နောက်ပြီး Code က Single Responbiltiy မရှိတော့ပါဘူး။ ဥပမာ Red State မှာ လုပ်မယ့် အတွက် ဒီ function ထဲမှာ if else တွေ နဲ့ စစ်ပြီး ရေးသားနေရသည့် အတွက် code က open/closed principle ကို မလိုက်နာတော့ပါဘူး။
State Pattern မှာ State Interface ရှိပြီး State တွေက interface ကို implement လုပ်ထားသည့် သဘောပါပဲ။
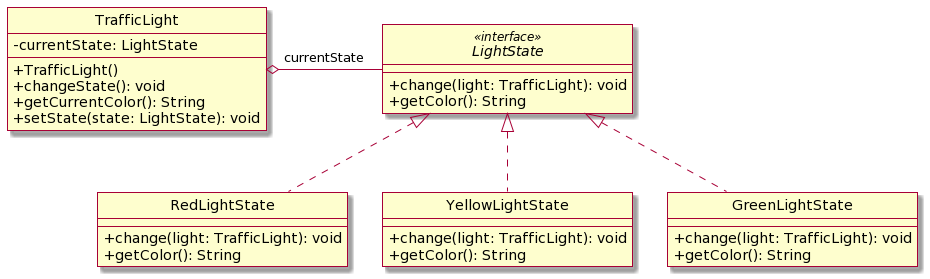
State မှာ အဆင့် တစ်ခု ကနေ နောက် တဆင့် ကို ပြောင်းသွားသည့် သဘောမျိုး တွေ မှာ အသုံးပြုပါတယ်။

LightState.java
interface LightState {
  void change(TrafficLight light);
  String getColor();
  void process();
}
RedLightState.java
class RedLightState implements LightState {
  @Override
  public void change(TrafficLight light) {
    light.setState(new YellowLightState());
  }

  @Override
  public String getColor() {
    return "Red";
  }

  @Override
  public void process() {
   System.out.print("Stop the car");
  }
}
YellowLightState.java
class YellowLightState implements LightState {
  @Override
  public void change(TrafficLight light) {
    light.setState(new GreenLightState());
  }

  @Override
  public String getColor() {
    return "Yellow";
  }

  @Override
  public void process() {
   System.out.print("Slown down");
  }
}
GreenLightState.java
class GreenLightState implements LightState {
  @Override
  public void change(TrafficLight light) {
    light.setState(new RedLightState());
  }

  @Override
  public String getColor() {
    return "Green";
  }

  @Override
  public void process() {
   System.out.print("Allow to go");
  }
}
TrafficLight.java
public class TrafficLight {
  private LightState currentState;

  public TrafficLight() {
    this.currentState = new RedLightState();
  }

  public void changeState() {
    currentState.change(this);
  }

  public void process() {
     currentState.process();
  }
  public String getCurrentColor() {
    return currentState.getColor();
  }

  public void setState(LightState state) {
    this.currentState = state;
  }
}
**
Main.java**
public class Main {
    public static void main(String[] args) {
        TrafficLight trafficlight = new TrafficLight()
        System.out.print(trafficelight.getCurrentColor());
        trafficelight.process();
        trafficelight.changeState();
        System.out.print(trafficelight.getCurrentColor());
        trafficelight.process();
    }
}
Pros and Cons
Single Responsibility ကို လိုက်နာထားပါတယ်။ State တစ်ခုဟာ သူ့ သက်ဆိုင်ရာ အလုပ်ပဲ လုပ်ပါတယ်။
Open/Closed Principle ကို လိုက်နာထားပါတယ်။ State တစ်ခု ကို ထပ်ဖြည့်ဖို့ လက်ရှိ code အဟောင်းကို ပြင်ဖို့ မလိုပါဘူး။
မကောင်းတာကတော့ state နည်းနည်းလေးပဲ ရှိသည့် အခါမှာတော့ over kill ဖြစ်နိုင်ပါတယ်။
Composite Pattern
Composite Pattern ကတော့ structural design pattern ဖြစ်ပါတယ်။ Composite က Tree Structure တွေ မှာ အသုံးများပါတယ်။ Tree Structure ပြဿနာတွေ ဆိုရင် Composite pattern ကို အသုံးပြုနိုင်ပါတယ်။
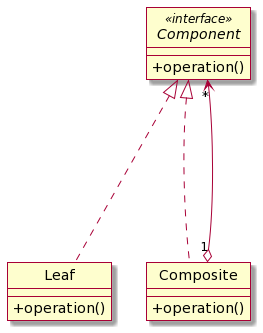
UML Diagram အတိုင်းပါပဲ Composite ထဲမှာ Component တွေ ပါပါတယ်။ Component တွေ ဖြစ်သည့် အတွက် Child Leaf လည်း ဖြစ်နိုင်သလို ကိုယ်တိုင် Composite class လည်း ဖြစ်နိုင်ပါတယ်။ တနည်းပြောရရင် File structure လိုမျိုး Folder အောက်မှာ Folder လည်း ဖြစ်နိုင်သလို File လည်း ဖြစ်နိုင်ပါတယ်။ Linux က file system တွေမှာ ဆိုရင် root(/) အောက်မှာ အခါ folder နဲ့ file တွေ ရှိပြီး အဆင့်ဆင့် ခွဲ သွားတာ မျိုးပေါ့။
/
/var/
/var/www/
/var/www/html/
/var/www/html/index.html
/var/www/html/hello.html
Composite Pattern မသုံးပဲ ပုံမှန် ရေးမယ် ဆိုရင် Folder Strcuture အတွက် UML က အောက်က ပုံ အတိုင်း ဖြစ်မှာပါ။
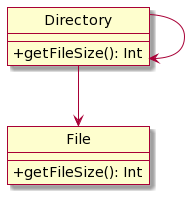
ဒီ Class Diagram မှာ အဓိ ပြဿနာက File အပြင် short cut ထပ်ဖြည့်မယ်ဆိုရင် Directory ထဲမှာ ထပ်ပြင်ရမယ်။ Open Close Principle နဲ့ မကိုက်တော့ဘူး။ တစ်ခု ထပ်လာတိုင်း တစ်ခါ ထပ်ပြင်နေရမှာပါ။ အဲဒီ လို ပြဿနာတွေ အတွက် Composite ကို သုံးပါတယ်။ Composite Pattern ကတော့ အောက်ကလို Clas Diagram ပါ။

Directory ဟာ Component Interface ကို Implement လုပ်ထားပြီး Directory ထဲ မှာ Component ထပ်ပါသေးတယ် လို့ ပြထားပါတယ်။
Code ကို ကြည့်ရအောင်။
FileComponent.java
public abstract class FileComponent {

    protected String name;

    public FileSystemComponent(String name) {
        this.name = name;
    }

    public abstract void print();

    public abstract int getSize();

}
File.java
public class File extends FileComponent {

    private int sizeInBytes;

    public File(String name, int sizeInBytes) {
        super(name);
        this.sizeInBytes = sizeInBytes;
    }

    public int getSize() {
        return sizeInBytes;
    }

    public void print() {
        System.out.println("--- file " + name + " size=" + getSize() + " bytes");
    }
}
Directory.java
public class Directory extends FileComponent {
    protected Collection<FileSystemComponent> fileSystemComponents = new ArrayList<FileSystemComponent>();

    public Directory(String name) {
        super(name);
    }

    public void addComponent(FileSystemComponent component) {
        fileSystemComponents.add(component);
    }

    public int getSize() {
        int sizeInBytes = 0;
        for (FileSystemComponent component : fileSystemComponents) {
            sizeInBytes += component.getSize();
        }
        return sizeInBytes;
  }

    public void print() {
        System.out.println("-- dir " + name + " size=" + getSize() + " bytes");

        for (FileSystemComponent component : fileSystemComponents) {
            component.print();
        }
    }
}
ဒီ code မှာ ဆိုရင် Directory အောက်မှာ File လည်း ရှိနိုင်သလို Directory လည်း ရှိနိုင်ပါတယ်။ အဲဒီ အတွက် getSize() ကို ခေါ်လိုက်ရင် child component တွေ ရဲ့ getSize() ကို ဆင့်ကာ ဆင့်ကာ ခေါ်ပြီး File Size ကို ရနိုင်ပါတယ်။
Pros and Cons
ကောင်းတာကတော့ Complex ဖြစ်သည့် Tree Structure တွေကို ရှင်းရှင်းလင်းလင်း ဖြစ်သွားစေပါတယ်။
Open/Close Principle ကို လိုက်နာထားတယ်။ File အပြင် short cut ထပ်ဖြည့်လည်း Directory က ဘာမှ ထပ်ပြင်ဖို့ မလိုတော့ပါဘူး။
မကောင်းတာကတော့ တူညီသည့် Structure မရှိသည့် Component တွေမှာ interface တွေ အများကြီး ထပ်သုံးနေရလိမ့်မယ်။ ဥပမာ File မှာ getSize ရှိပေမယ့် ShotCut မှာ getSize မရှိသည့် အခါ။ နောက်ပြီး Vault Directory ဆိုပြီး ထပ်ဖြည့်သည့် အခါမှာ interface တွေ ထပ်ပေါင်း ထည့်ရပြီး interface တွေ အများကြီး ဖြစ်သွားနိုင်ပါတယ်။
Iterator Pattern
Iterator Pattern က behaviour pattern တစ်ခုပါ။ Loop ပတ်သည့် အခါမှာ အကုန်လုံးကို ဆွဲထုတ်ပြီး loop ပတ်တာ မဟုတ်ပဲ index နဲ့ ထောက်ပြီး loop ပတ်တာ ဒါမှမဟုတ် tree struture တွေမှာ search method အမျိုးမျိုး နဲ့ ရှာသည့် အခါမှာ သုံးနိုင်ပါတယ်။ Database တွေမှာ data ကို အကုန် ဆွဲထုတ်ပြီး loop ပတ်တာ မဟုတ်ပဲ cursor ကို သုံးပြီး loop လုပ်သည့် သဘောမျိုး နဲ့ လည်း ဆင်ပါတယ်။ တနည်းပြောရင် pointer ထောက် သွားပြီး next နဲ့ သွားသည့် သဘောပါပဲ။

UML class ကို ကြည့်လိုက်ရင် နည်းနည်း ရှုပ်နိုင်ပါတယ်။ Iterator က composite pattern နဲ့ တွဲ သုံးလို့ အဆင်ပြေပါတယ်။
interface MyIterator {
    boolean hasNext();
    Integer next();
}

class MyCollection {
    private Integer[] items;
    private int currentIndex = 0;

    public MyCollection(Integer[] items) {
        this.items = items;
    }

    public boolean hasNext() {
        return currentIndex < items.length;
    }

    public Integer next() {
        if (!hasNext()) {
            return null;
        }
        return items[currentIndex++];
    }
}

public class Main {
    public static void main(String[] args) {
        Integer[] items = {1, 2, 3, 4, 5};
        MyCollection myCollection = new MyCollection(items);

        while (myCollection.hasNext()) {
            System.out.println(myCollection.next());
        }
    }
}
ဒီ code မှာ ဆိုရင် collection ကို loop ပတ်သည့် အခါမှာ collection count နဲ့ မပတ်သွားပဲ hasNext() နဲ့ စစ်ပြီး iteration လုပ်သွားတာကို တွေ့နိုင်ပါတယ်။
Pros and Cons
Single Responsibility ကို လိုက်နာထားပါတယ်။ Class က သူ့ ရဲ့ responsibility ပဲ ရှိပြီး iterator ကို သီးသန့် ခွဲထုတ်ထားပါတယ်။ iterator ကလည်း သူ့ရဲ့ single responsibility ပဲ ရှိပါတယ်။
Open/Closed Principle ကို လိုက်နာထားပါတယ်။ DFSIterator နဲ့ BFSIterator အပြင် အခြား tree အတွက် iterators တစ်ခု ထပ်ဖြည့်ချင်ရင် code အဟောင်းတွေကို ပြင်ဖို့ မလိုပါဘူး။
မကောင်းတာကတော့ over kill ဖြစ်နိုင်တယ်။ ပုံမှန် ရိုးရှင်း သည့် looping တွေမှာ မသုံးသင့်ပါဘူး။
Chain Of Responsibility Pattern
Chain of Responsibility Pattern က Behaviour Pattern တစ်ခုပါ။ Chain Of Responbility က chain တွေလိုမျိုး အဆင့် တွေ ကို တစ်ခု ပြီး တစ်ခု အလုပ်လုပ်သွားသည့် ပုံစံမျိုးပါ။ Handler က successor ကို ထပ်ခါ ထပ်ခါ ခေါ်သွားသည့် ပုံစံမျိုးပါ။

အောက်က ပုံလေးကို ကြည့် လိုက်ရင် နားလည် ပါလိမ့်မယ်။

ဒီပုံလေးကို မြင်လိုက်တာ နဲ့ backend developer တွေ ဆိုရင် Middleware ပဲ ဆိုတာ မြင်သွားပါလိမ့်မယ်။ Request တစ်ခု ရောက်လာရင် middleware ခံပြီးတော့ မှန် ခဲ့ ရင် next ကို ခေါ်ခေါ်သွားတာကို သတိရမှာပါ။
backend request ရောက်လာရင် login ဝင်ထားလား။ မှန်ရင် next ။ admin user ဖြစ်လား။ မှန်ရင် next။ ဒီ အတွက် permission ရှိလား မှန်ရင် next နဲ့ သွားပြီးတော့ file response ကို ပြပေးတာပါ။
express မှာ ဆိုရင်
app.use((req, res, next) => {
  // do something before the request is handled
  next();
});
အဲဒီ code က Chain Of Responsibility pattern ပါပဲ။ အခု အဲဒီ pattern ကို အသုံးပြုပြီး middleware ပုံစံ အကြမ်းလေး တစ်ခု ရေးကြည့်ရအောင်။
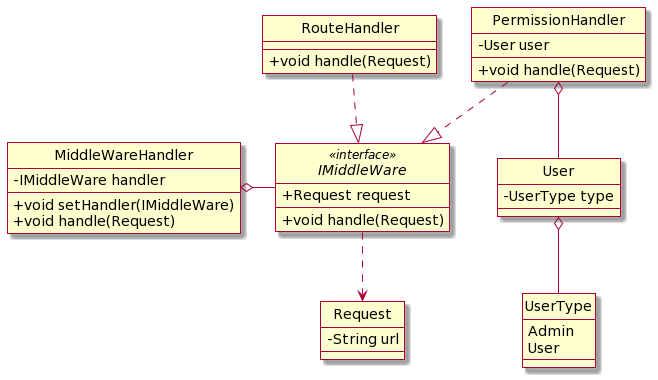
ဒီ code မှာ ဆိုရင် IMiddlware က Interface ဖြစ်ပြီး တကယ် handling လုပ်တာ ကတော့ AuthHandler နဲ့ Permission Handler ပါပဲ။
MiddlewareHandler -> RouteHandler -> PermissionHandler -> Finish
အဲဒီ ပုံစံ အတိုင်း အလုပ်လုပ်ပါမယ်။ MiddlewareHandler ကနေ Middleware တစ်ခု ဖြစ်သည့် Auth Handler ကို ခေါ်မယ်။ ပြီးရင်း route မှာ permission ရှိမရှိ စစ်ဖြစ်ဖို့ အတွက် PermissionHandler ကို ဆက်ခေါ်မယ်။ တကယ်လို့ အဆင်ပြေတယ် ဆိုရင် ပြီးသွားပြီပေါ့။
ပုံမှန် အားဖြင့် ဒီ pattern မသုံးပဲ ရေးသည့် အခါမှာ if else တွေ အများကြီး သုံးရပါမယ်။
if (route == "\hello") {
  if (user.type == "admin") {
    System.out.print("Success")
  }
  else  {
    System.out.print("Not allow")
  }
}
else {
 System.out.print("Not found")
}
တကယ်လို့ အခြား ထပ်ပြီးတော့ စစ်တာတွေ ထည့်မယ်။ ဥပမာ JWT Auth ကို စစ်တာ ထပ်ဖြည့်မယ်။ ဒါဆိုရင် if else ထဲမှာ ထပ် ပြင်ရအုံးမယ်။ တနည်းပြောရင် Open Close Principle ကို မလိုက်နာတော့ဘူး ဖြစ်သွားမယ်။ ဒီလို အခြေအနေ မှာ ဆိုရင် Chain Of Responsiblity က အသင့်တော်ဆုံးပါပဲ။
IMiddleWare.java
public abstract class IMiddleWare {

    IMiddleWare nextHandler;
    private Request request;

    IMiddleWare(IMiddleWare handler) {
        this.request = request;
        this.nextHandler = handler;
    }

    public abstract void handle(Request request);

}
RouteHandler.java
public class RouteHandler extends IMiddleWare {

    AuthHandler(IMiddleWare handler) {
        super(handler);
    }
    @Override
    public void handle(Request request) {
        if(request.url.contains("/hello")) {
            this.nextHandler.handle(request);
        }
        else {
            System.out.println("Not Found");
        }
    }
}
PermissionHandler.java
public class PermissionHandler extends IMiddleWare {
    User user;
    PermissionHandler(User user, IMiddleWare handler) {
        super(handler);
        this.user = user;
    }

    @Override
    public void handle(Request request) {
        if(this.user.type == UserType.Admin) {
            System.out.println("Success");
        }
        else {
            System.out.println("Sorry, You don't have a permission");
        }
    }
}
MiddleWareHandler.java
public class MiddleWareHandler {

    IMiddleWare handler;

    public void setHandler(IMiddleWare handler) {
        this.handler = handler;
    }

    public void handle(Request request) {
        handler.handle(request);
    }
}
Application.java
public class Application {

    public static void main(String[] args) {
        User user = new User();
        user.type = UserType.Admin;
        Request request = new Request("http://www.example/hello");

        PermissionHandler permissionHandler = new PermissionHandler(user,null);
        AuthHandler authHandler = new AuthHandler(permissionHandler);

        MiddleWareHandler middleware = new MiddleWareHandler();
        middleware.setHandler(authHandler);
        middleware.handle(request);

    }
}
Pros and Cons
Single Responsibility ဖြစ်ပါတယ်။ Chain တိုင်းမှာ သူ့ လုပ်ရမယ့် အလုပ်ကို သာ လုပ်ပါတယ်။
Open/Closed Principle ကို follow လုပ်ထားပါတယ်။
မကောင်းတာကတော့ Request တစ်ခုခု က next handling ကို မလုပ်ထားခဲ့ရင် ရပ်သွားမှာပါ။
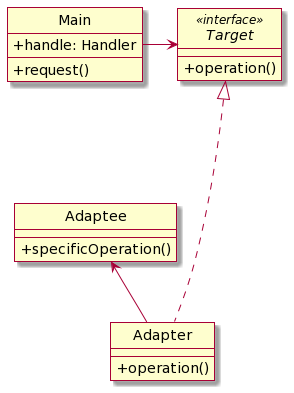
Adapter Pattern
Adapter Pattern ဆိုတာကတော့ Structural Pattern တစ်ခုပါ။ Adapter ဆိုတာနဲ့ ပလပ်ပေါက်တွေ မှာ ထပ်မရရင် သုံးသည့် adapter ကို တန်းမြင်ကြမှာပါ။
Adapter Pattern က အဲဒီ အတိုင်းပါပဲ။ မတူညီသည့် class နှစ်ခုကို တစ်ခု နဲ့ တစ်ခု သုံးလို့ ရအောင် ပြောင်းပေးတာပါ။ Adapter Pattern ကို framework တော်တော်များများမှာ database connection အတွက် adapter pattern ကို သုံးထားတာကို တွေ့ဘူး ပါလိမ့်မယ်။ MySQL သုံးချင်ရင် MySQL Adapter သုံး။ Postgres သုံးချင်ရင် Postgres adapter သုံး။ မူရင်း code ကတော့ database ပြောင်းပေမယ့် code level မှာတော့ ဘာမှမပြောင်းလဲ ပဲ သုံးနေလို့ရတာမျိုးပေါ့။
Adapter Pattern ရဲ့ class diagram ကို ကြည့်ကြည်ပါ။ တစ်ခုခု ကို Convert ပြောင်းပေးဖို့ ကြားခံသုံးထားတာ ကို တွေ့ရမှာပါ။
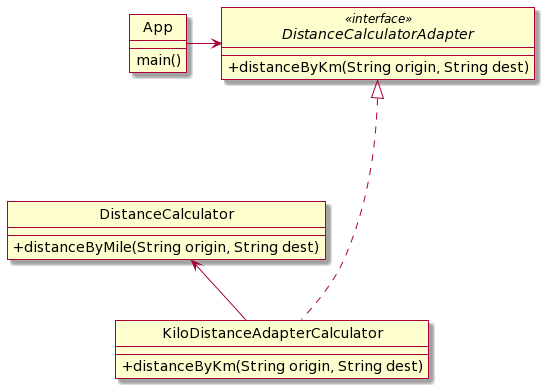
ဥပမာ အနေနဲ့ User ဘက်မှာ လိုချင်သည့် data က km နဲ့ ပဲလိုချင်တယ်။ လက်ရှိ library က km နဲ့ ပြန်မထုတ်ပေးနိုင်ဘူး။ point ၂ ခု ကို တွက်ပြီးရင် mile ပဲ response ပြန်ပေးနိုင်တယ်။

ဒါဆိုရင် ကျွန်တော်တို့ တွေက ကြားခဲ့ km to mile ပြောင်းသည့် adapter ကို ခံပြီး သုံးဖို့ လိုပါပြီ။
Java code ကို ကြည့်ရအောင်။
DistanceCalculator.java
class DistanceCalculator {
    public double distanceByMile(String origin, String dest) {
        return (new Random()).nextInt(100);
    }
}
DistanceCalculatorAdapter.java
interface DistanceCalculatorAdapter {
    double distanceByKm(String origin, String dest);
}
KiloDistanceAdapterCalculator.java
class KiloDistanceAdapterCalculator implements DistanceCalculatorAdapter {
    private DistanceCalculator distanceCalculator;

    public KiloDistanceAdapterCalculator(DistanceCalculator distanceCalculator) {
        this.distanceCalculator = distanceCalculator;
    }

    @Override
    public double distanceByKm(String origin, String dest) {
        double distanceInMiles = distanceCalculator.distanceByMile(origin, dest);
        double distanceInKm = distanceInMiles * 1.609344; // Convert miles to kilometers
        return distanceInKm;
    }
}
App.java
public class App {
 public static void main(String[] args) {
   DistanceCalculator distanceCalculator = new DistanceCalculator();
   double distanceInMiles = distanceCalculator.computeDistance("city1", "city2");
   System.out.println("The distance between city1 and city2 ="+distanceInMiles+" miles");

   DistanceCalculatorAdapter distanceAdapter = new KiloDistanceAdapterCalculator(distanceCalculator);
   double distanceInKilometers = distanceAdapter.distanceByKm("city3", "city4");
   System.out.println("The distance between city3 and city4 ="+distanceInKilometers+" kilometers");
 }
}
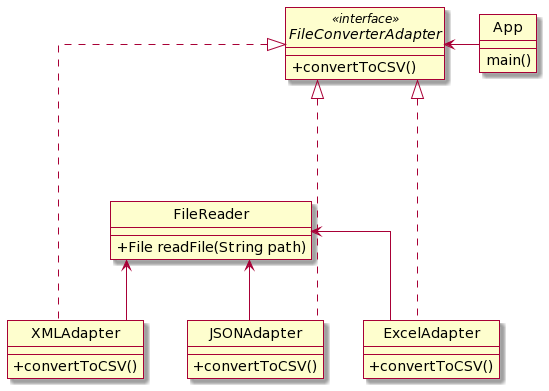
Adapter pattern ကို file converter တွေ မှာလည်း အသုံးပြုနိုင်တယ်။ လက်ရှိ ရှိနေတာက file ကို csv နဲ့ လိုချင်တယ်။ File က JSON ဖြစ်နေတာ ဖြစ်နိုင်သလို XML ဖြစ်နေတာလည်း ဖြစ်နိုင်တယ်။ Excel ဖြစ်နေတာလည်း ဖြစ်နိုင်ပါတယ်။ အဲဒီ အခါမှာ adapter pattern ကို အသုံးပြုပြီး ဖြေရှင်းနိုင်ပါတယ်။
Pros and Cons
Adapter pattern သုံးခြင်းဖြင့် Single Responbility ကို လိုက်နာထားသလို Open/Close Principle ကိုလည်း လိုက်နာပါတယ်။
မလိုအပ်ပဲ သုံးရင်တော့ interface တွေ အရမ်းများသွားတာ ဖြစ်နိုင်ပါတယ်။
Proxy Pattern
Proxy pattern က ကြားခံ တဆင့်ခံပြီး အလုပ်လုပ်သည့် ပုံစံပါ။ UML ကို ကြည့်ကြည့်ပါ။
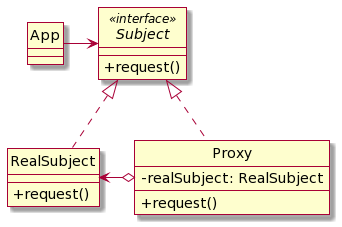
ဥပမာ Database နဲ့ တွဲပြီး ရေးသည့် အခါမှာ Query လုပ်လိုက်တယ်။ Result ပြန်လာတယ်။ ဒါပေမယ့် ကျွန်တော်တို့တွေက cache ထည့်လိုက်ချင်တယ်။ Cache ထည့်ဖို့ အတွက် လက်ရှိ Database code တွေလည်း မထိချင်သည့် အခါမှာ Proxy Pattern ကို အသုံးပြုလို့ ရပါတယ်။
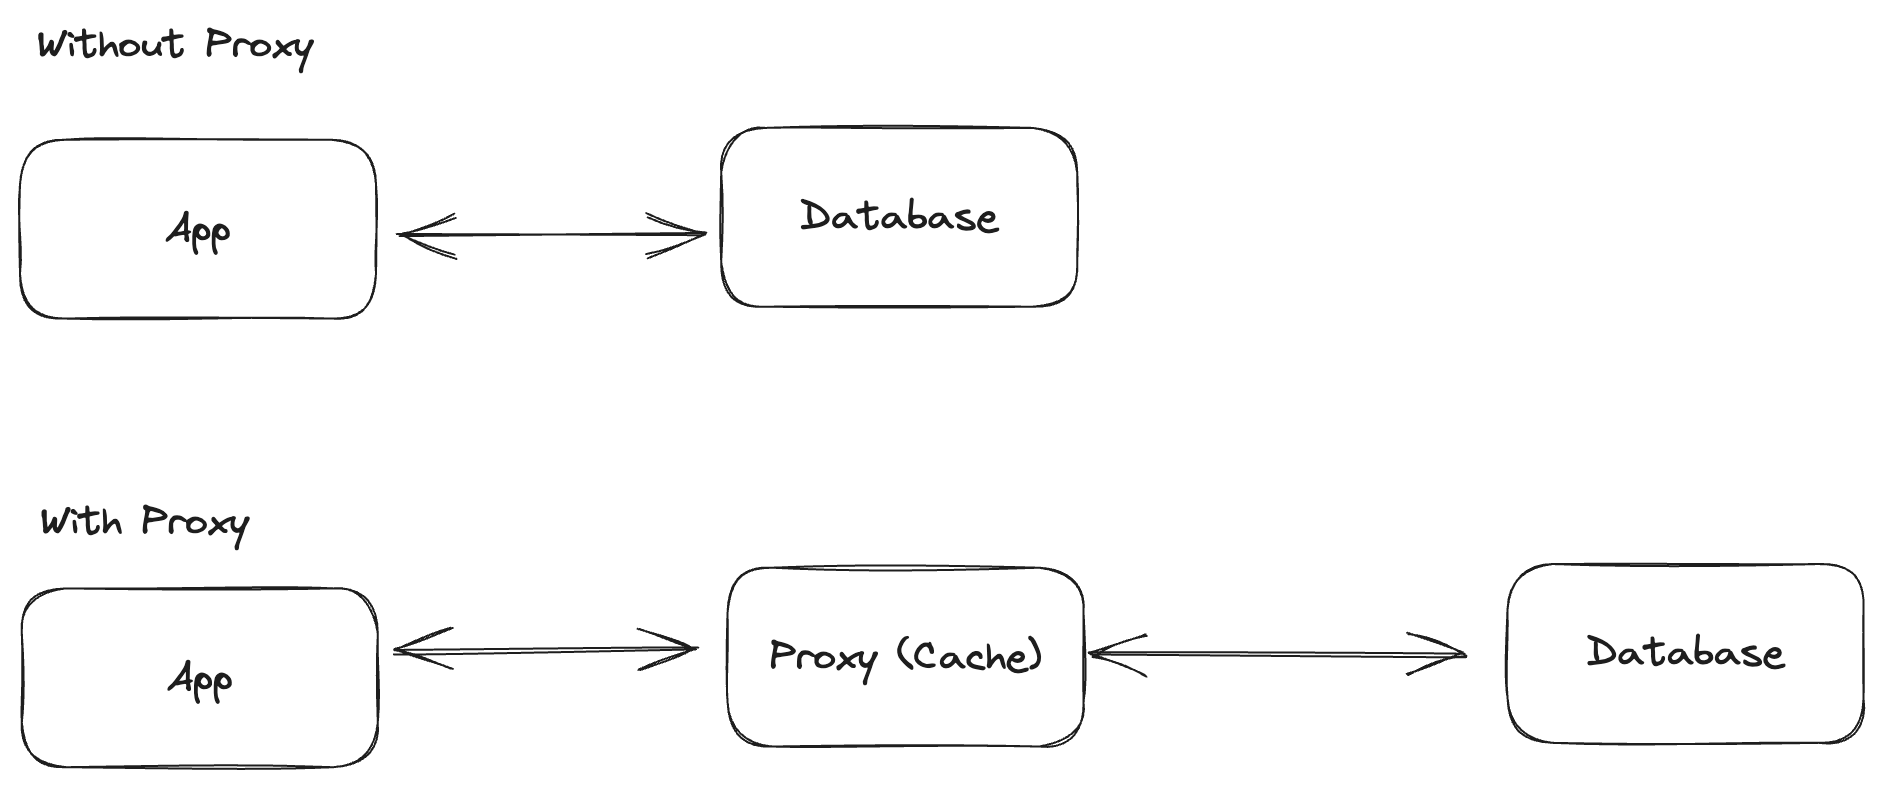
အခု ပုံမှာဆိုရင် Cache ကို Proxy နဲ့ အသုံးပြုလိုက်တာပါ။ လက်ရှိ code တွေကို ထိခိုက်မှု မရှိပဲ cache ထည့်ပြီးသား ဖြစ်သွားပါတယ်။
ထပ်ပြီးတော့ Log ကို ထည့်ဖြည့်မယ်ဆိုတာပါတော့။

Proxy မပါသည့် Class Diagram ကြည့်ရအောင်။
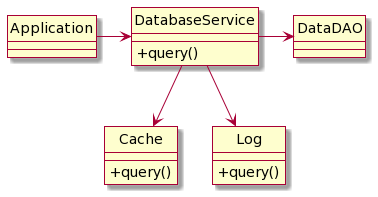
ကျွန်တော်တို့ နောက်ထပ် Performance တိုင်းဖို့ stop watch ထပ်ဖြည့်ချင်ရင် ထပ်ပြီး class ဆောက်ရမယ်။ Application ကို ပြင်ဖို့ လိုပါအုံးမယ်။ အသစ်တွေ ထပ်လာတိုင်း if/else condition တွေ နဲ့ ထပ်ပြီး ပြင်နေရမှာပါ။
Proxy Pattern နဲ့ ဆိုရင် အခု လို ပြောင်းရေးပါမယ်။
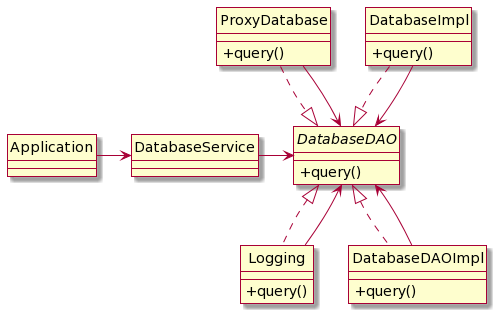
အခု အပိုင်းမှာတော့ DatabaseDAO ကို extend လုပ်ပြီး ရေးထားတာ ဖြစ်သည့် အတွက် အသစ်တွေ ထပ်ဖြည့်ရင် လွယ်သွားမှာပါ။
Code ပိုင်းက ပြန်ခေါ်ရင်တော့ ဒီ လို အဆင့်ဆင့် ခေါ်သွားမှာပါ။

Java Code ကို ကြည့်ရအောင်။
Application.java
public class Application {
    public static void main(String[] args) {
        DatabaseDAOImpl db = new DatabaseDAOImpl();
        CacheProxyDatabase cache = new CacheProxyDatabase(db);
        LoggingProxy logProxy = new LoggingProxy(cache);

        logProxy.query();
    }
}
ဒီ code မှာ ဆိုရင် db.query() ကို မခေါ်ပဲ Proxy တွေ ခံပြီး ခေါ်ထားပါတယ်။
Chain Of Responbility လို တစ်ခုပြီး တစ်ခု ခေါ်သွားပါတယ်။ မတူတာကတော့ chain of responbility မှာ next handler နဲ့ သွားပြီး ပြန်ထွက်သွားမယ့် ကိစ္စ ရှိပါတယ်။
Proxy ကတော့ ကြားခံ သဘောပါပဲ။
DatabaseDAO.java
public interface DatabaseDAO {
    void query();
}
DatabaseDAOImpl.java
public class DatabaseDAOImpl implements DatabaseDAO {
    @Override
    public void query() {
        System.out.println("QUERY");
    }
}
CacheProxyDatabase.java
public class CacheProxyDatabase implements DatabaseDAO{

    DatabaseDAO dao;

    CacheProxyDatabase(DatabaseDAO dao) {
        this.dao = dao;
    }
    @Override
    public void query() {
        System.out.println("Cache:: Query from Cache");
        dao.query();
    }
}
LoggingProxy.java
public class LoggingProxy implements DatabaseDAO {

    DatabaseDAO dao;
    LoggingProxy(DatabaseDAO dao) {
        this.dao = dao;
    }
    @Override
    public void query() {
        System.out.println("Log:: Start Query");
        dao.query();
        System.out.println("End:: Start Query");
    }
}
Pros and Cons
Service object ကို client ဘက်က သိဖို့ မလိုပဲ လိုသလို ထိန်းချုပ်ပြောင်းလဲ နိုင်တယ်။
နောက်ပြီးတော့ service တစ်ခု ရဲ့ life cycle ကို client ဘက်က သိဖို့ မလိုပဲ ဖန်တီးနိုင်ပါတယ်။
Open/Closed Principle ကို follow လုပ်ထားသည့် အတွက်ကြောင့် proxy အောက်မှာ ထပ်ပြီး proxy တွေ ခံလို့ရပါတယ်။
မကောင်းတာကတော့ proxy တွေ များသွားရင် နှေးသွားနိုင်တာပါ။
Code ကလည်း trace ပြန်လိုက်သည့် အခါမှာ အဆင့်ဆင့် သွားနေရာလို့ ရှုပ်ထွေးသွားနိုင်ပါတယ်။
Factory Pattern
Factory Pattern က Creational Pattern တစ်ခု ဖြစ်ပါတယ်။ Factory ဆိုသည့် အတိုင်း စက်ရုံကနေ ပစ္စည်း ထုတ် သလို object တွေကို ဖန်တီးပေးသည့် pattern တစ်ခုပါ။
Factory pattern မသုံးခင်မှာ Object တွေကို လက်ရှိ code တွေထဲကနေ ရောရေးပြီး ဖန်တီးပါတယ်။ Factory pattern က single responsibility ဖြစ်ပြီး separation of concern အရ object ဖန်တီး မှု ကို ခွဲထုတ်ရေးသားလိုက်ခြင်း မျိုးပါပဲ။

ဥပမာ CreditCardFactory ကနေ CreditCard ကို generate လုပ်ပေးထားပါတယ်။
public class CreditCardFactory {
 static CreditCard getCreditCardInstance(String type, String number, double limit,double annualCharge) {
  return new CreditCard(type, number, limit, annualCharge);
 }
}
public class Application {
  public static void main(String[] args) {
    CreditCard creditCard2 = CreditCardFactory.getCreditCardInstance("visa","4111111111111111", 2500.0, 10)
  }
}
တိုက်ရိုက်ခေါ်မသုံးပဲ Factory pattern ကနေ generate လုပ်သုံးသင့်လဲ ဆိုတာကတော့ လိုအပ်သည့် data တွေကို encapsulation လုပ်လို့ရအောင်ပါ။ ဥပမာ credit card ကို မပို့ခင်မှာ အခြား validation တွေ စစ်ဆေးတာမျိုးတွေ ထည့်သွင်းလို့ရပါတယ်။
ထပ်ပြီး ဥပမာ ကြည့်ရအောင်။ Factory Pattern မသုံးခင် java code ကို ကြည့်ရအောင်။
public class Shape {
  public void draw() {
    System.out.println("Drawing a shape");
  }
}

public class Circle extends Shape {
  @Override
  public void draw() {
    System.out.println("Drawing a circle");
  }
}

public class Rectangle extends Shape {
  @Override
  public void draw() {
    System.out.println("Drawing a rectangle");
  }
}

public class Client {
  public static void main(String[] args) {
    Shape circle = new Circle();
    circle.draw();

    Shape rectangle = new Rectangle();
    rectangle.draw();
  }
}
Client class က Circle နဲ့ Rectangle ကို main class ထဲမှာ ထည့်ရေးထားပါတယ်။
Factory pattern ပြောင်းပြီး ရေးမယ် ဆိုရင်
// Shape interface
public interface Shape {
  void draw();
}

// Concrete Shape classes
public class Circle implements Shape {
  @Override
  public void draw() {
    System.out.println("Drawing a circle");
  }
}

public class Rectangle implements Shape {
  @Override
  public void draw() {
    System.out.println("Drawing a rectangle");
  }
}

// Factory class
public class ShapeFactory {
  public static Shape getShape(String shapeType) {
    if (shapeType.equals("circle")) {
      return new Circle();
    } else if (shapeType.equals("rectangle")) {
      return new Rectangle();
    } else {
      throw new IllegalArgumentException("Invalid shape type");
    }
  }
}

// Client code
public class Client {
  public static void main(String[] args) {
    Shape circle = ShapeFactory.getShape("circle");
    circle.draw();

    Shape rectangle = ShapeFactory.getShape("rectangle");
    rectangle.draw();
  }
}
Factory Pattern ဟာ proxy pattern နဲ့ တွဲပြီး အသုံးပြုနိုင်ပါတယ်။ Proxy Pattern မှာ class တစ်ခုကနေ နောက်တစ်ခု ကို ဆင့်ကာဆင့်ကာ ခေါ်သွားသည့် အခါမှာ proxy တွေ ကို တစ်ခု ခြင်းဆီ create လုပ်နေရပါတယ်။ အဲဒီ အစား Factory Pattern ကနေ generate လုပ်ပေးနိုင်ပါတယ်။
Factory Pattern မှာ နောက်ထပ်ရှိသည့် တစ်မျိုးကတော့ Factory က Factory ကို interface လုပ်ပြီး သက်ဆိုင်ရာ class ပြန်ထုတ် ပေးတာမျိုးပါ။ ဥပမာ PhoneFactory လိုမျိုးပေါ့။

Factory pattern ကို Unit Testing တွေမှာလည်း အသုံးပြုပါတယ်။ Unit Testing အတွက်ဆိုရင် Mock ကို generate လုပ်ပြီး code run သည့် အခါမှာတော့ သက်ဆိုင်ရာ code ကို ထုတ်ပေးသည့် သဘောမျိုးပေါ့။
Pros and Cons
Tight coupling မဖြစ်အောင် ရှောင်ရှားနိုင်ပါတယ်။
Single Responsibility နဲ့ Open/Closed Principle ကို လိုက်နာ ထားပါတယ်။
မကောင်းတာကတော့ code တွေ complicated ဖြစ်နိုင်ပါတယ်။ မလိုအပ်ပဲ subclass တွေ များလာနိုင်ပါတယ်။
Builder Pattern
Builder Pattern က Creational Pattern တစ်ခု ဖြစ်ပါတယ်။ Builder ဆိုသည့် အတိုင်း object ကို ဆောက်သည့် နေရာမှာ အသုံးပြုပါတယ်။
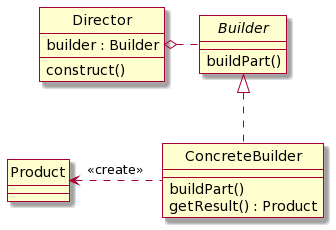
Builder Pattern က object ကို immutable လုပ်ချင်သည့် အခါမှာ အသုံးပြုပါတယ်။ ပုံမှန် အားဖြင့် object ကို immutable လုပ်ချင်သည့် အခါမှာ Consturctor မှာ pass လုပ်ပေးရပါတယ်။
public class Person {
    private String firstName;
    private String lastName;
    private int age;
    private String email;
    private String phone;
    private String address;
}
ဒီ Person class မှာ constructor ထည့်သည့် အခါမှာ ၆ ခု လုံး ထည့်မှ ဖြစ်ပါလိမ့်မယ်။
public class Person {
    private String firstName;
    private String lastName;
    private int age;
    private String email;
    private String phone;
    private String address;

    Person(String firstName,String lastName, int age, String email,String phone,String address) {
        this.firstName = firstName;
        this.lastName = lastName;
        this.age = age;
        this.email = email;
        this.phone = phone;
        this.address = address;
    }
}
အဲဒီ code ကို သုံးမယ် ဆိုရင်
Person person = new Person("Saturn","God",36,"hello@example.com","Somewhere");
Parameter တွေ အများကြီး pass လုပ်ထားရပြီး readable မဖြစ်ပါဘူး။ တကယ်လို့ နောက်ထပ် parameter ထပ်ပါလာပြီ ဆိုရင် ထပ်ဖြည့် ရပါအုံးမယ်။
Builder Pattern နဲ့ ဆိုရင် အခု လို ရေးလို့ရပါတယ်။
public class Person {
    private String firstName;
    private String lastName;
    private int age;
    private String email;
    private String phone;
    private String address;

    private Person(Builder builder) {
        this.firstName = builder.firstName;
        this.lastName = builder.lastName;
        this.age = builder.age;
        this.email = builder.email;
        this.phone = builder.phone;
        this.address = builder.address;
    }

    @Override
    public String toString() {
        return "Person{" +
                "firstName='" + firstName + '\'' +
                ", lastName='" + lastName + '\'' +
                ", age=" + age +
                ", email='" + email + '\'' +
                ", phone='" + phone + '\'' +
                ", address='" + address + '\'' +
                '}';
    }

    public static class Builder {
        private String firstName;
        private String lastName;
        private int age;
        private String email;
        private String phone;

        public Builder(String firstName, String lastName) {
            this.firstName = firstName;
            this.lastName = lastName;
        }

        public Builder age(int age) {
            this.age = age;
            return this;
        }

        public Builder email(String email) {
            this.email = email;
            return this;
        }

        public Builder phone(String phone) {
            this.phone = phone;
            return this;
        }

        public Builder address(String phone) {
            this.address = address;
            return this;
        }

        public Person build() {
            return new Person(this);
        }
    }
}
Builder class ထည့်ပြီးရင်တော့ Person class ကို build သည့် အခါမှာ အခုလို မျိုး build လုပ်လို့ရပါတယ်။
public static void main(String[] args) {
        Person person = new Builder("John", "Doe")
                .age(30)
                .email("john.doe@example.com")
                .phone("+1234567890")
                .address("john@example.com")
                .build();
        System.out.println(person);
}
Builder Pattern က ရိုးရှင်းပြီး သုံးရတာ လွယ်ကူပါတယ်။ ပုံမှန် အားဖြင့် setter တွေ ထည့်သည့် အခါမှာ class က mutable ဖြစ်သွားပြီး constructor ကနေ pass လုပ်ရင် code က ဖတ်ရတာ ခက်သွားပါတယ်။
Builder pattern က တော့ ရိုးရှင်းလွယ်ကူ ပြီး ထပ်ဖြည့်သည့် အခါမှာလည်း လွယ်လင့် တကူ ဖြည့်နိုင်ပါတယ်။
Pros and Cons
Object တွေကို step-by-step construct လုပ်နိုင်တယ်။
Single Responsibility Principle ကို လိုက်နာထားတယ်။
မကောင်းတာကတော့ properties များလာလေလေ class ကို ပိုပြီး ရှုပ်ထွေးလာစေပါတယ်။
Singleton Pattern
Singleton Pattern က creational design pattern တစ်ခု ဖြစ်ပါတယ်။ Developer တော်တော်များများ လည်း အသုံးပြုကြပါတယ်။ Singleton ကတော့ ရိုးရှင်းပါတယ်။ Class က instance တစ်ခု ပဲ ဖန်တီးထားပြီး အဲဒီ instance ကို ပဲ အမြဲ သုံးနေဖို့ပါပဲ။

ဥပမာ User login ဝင်ပြီးသွားရင် CurrentUser instance ကို အမြဲခေါ်ပြီး user name, user token တွေ ရယူ နေသလိုပေါ့။
Singleton ကို Database Connection Pool တွေမှာလည်း အသုံးများပါတယ်။ DB connection ဟာ ၂ ခါ ၃ ခါ ထပ်ဆောက်နေဖို့ မလိုပါဘူး။ တစ်ကြိမ် ဆောက်ပြီးသွားရင် ကြိုက်သည့် class ကနေ ခေါ်ပြီး အသုံးပြုနိုင်ပါတယ်။
public class ConnectionPool {
    private static ConnectionPool pool = new ConnectionPool();
    private Connection connection = new Connection();

    private ConnectionPool() {}

    public static ConnectionPool getInstance() {
        return pool;
    }

    public Connection getConnection(){
        return connection;
    }
}
ဒီ class မှာ ဆိုရင်
private static ConnectionPool pool = new ConnectionPool();
ConnectionPool ကို static ကြေငြာထားပြီးတော့
public static ConnectionPool getInstance() {
        return pool;
}
getInstance() static function ကနေ ယူ သုံးထားတာ တွေ့နိုင်ပါတယ်။ တနည်းပြောရင် ConnectionPool.getInstance() ဆိုရင် ဖန်တီးထားပြီး ဖြစ်သည် pool ကို ပဲ return ပြန်ပါလိမ့်မယ်။

ဒီ code ရဲ့ ပြဿနာက pool က သုံးသည် ဖြစ်စေ မသုံးသည် ဖြစ်စေ memory ပေါ်မှာ နေရာ ယူထားတာပါ။ တကယ်ကို သုံးသည့် အခါမှာ connection pool ကို ဆောက်ချင်သည့် အခါမှာ code ကို အောက်ပါအတိုင်း အနည်းငယ် ပြင်ပါမယ်။
public class ConnectionPool {
    private static ConnectionPool pool;
    private Connection connection = new Connection();

    private ConnectionPool() {}

    public static ConnectionPool getInstance() {
        if (pool == null) {
            pool = new ConnectionPool();
        }
        return pool;
    }

    public Connection getConnection(){
        return connection;
    }
}
ဒါဆိုရင် pool က null ဖြစ်နေသည့် အချိန်မှ connection pool အသစ် တစ်ခု ကို ဆောက်ပါလိမ့်မယ်။
ဒီ code မှာ နောက် ထပ် issue က
private ConnectionPool() {}
constructor က ဘာမှ မထည့်ထားသည့် အတွက် getInstance() ကို မသုံးပဲ constractor က သုံးလို့ရနေတယ်။
ConnectionPool mypool = new ConnectionPool();
ဆိုပြီး တစ်ခြား class က ခေါ်လို့ရနေပါတယ်။
ဒါကြောင့် code ကို ဒီလို ပြင်ပါမယ်။
private ConnectionPool() {
    if (pool != null) {
        throw new RuntimeException("Use getInstance() method");
    }
}
pool က null မဟုတ်တော့ဘူး။ တနည်းပြောရင် getInstance() ကို တစ်ခါ ပြောပြီးရင် instance ကို အသစ်ဆောက် ခွင့် မပြုတော့ပဲ RuntimeException ပြန်လုပ်တာပါ။
ဒါပေမယ့် Singleton က Thread safe မဖြစ်ပါဘူး။
    Thread t1 = new Thread(new Runnable() {
        @Override
        public void run() {
            ConnectionPool instance1 = ConnectionPool.getPool();
            System.out.println("Instance 1 hash:" + instance1.hashCode()); }
        });


        Thread t2 = new Thread(new Runnable() {
            @Override
            public void run() {
                ConnectionPool instance2 = ConnectionPool.getPool();
                System.out.println("Instance 2 hash:" + instance2.hashCode()); }
        });
ဒီမှာ ဆိုရင် hashcode မတူတာကို တွေ့နိုင်ပါတယ်။
Singleton သဘော တရား အရ instance တစ်ခု တည်း ဖြစ်ရမှာ ဖြစ်သည့် အတွက်ကြောင့် thread safe မဖြစ်တာပါ။
Java မှာ တော့ thread safe ဖြစ်ချင်သည့် အခါမှာ function မှာ synchronized ထည့် လိုက်ရုံပါပဲ။
public static synchronized ConnectionPool getInstance() {
        if (pool == null) {
            pool = new ConnectionPool();
        }
        return pool;
    }
နောက် တနည်းကတော့ create လုပ်သည့် အချိန်မှာ synchronized ထည့်တာပါ။
public static ConnectionPool getInstance() {
        if (pool == null) {
            synchronized (ConnectionPool.class) {
                if (pool == null) {
                    pool = new ConnectionPool();
                }
        }
        return pool;
}
အကယ်၍ class ကို serialize လုပ်မယ် ဆိုရင် ပြန် ပြီး unserialize လုပ်သည့် အခါမှာ instance အသစ် ထပ်ဖြစ်သွား နိုင်ပါတယ်။ အဲဒါကို ကာကွယ်ဖို့ readResolve() ကို အသုံးပြုနိုင်ပါတယ်။
public class ConnectionPool {
    private static ConnectionPool pool;
    private Connection connection = new Connection();

    private ConnectionPool() {}

    public static ConnectionPool getInstance() {
        if (pool == null) {
            synchronized (ConnectionPool.class) {
                if (pool == null) {
                    pool = new ConnectionPool();
                }
        }
        return pool;
    }

    public Connection getConnection(){
        return connection;
    }

    protected Object readResolve() {
        return getInstance();
    }
}
Pros and Cons
Class က Single instance ပဲ ရှိပါမယ်။
Global access point အနေနဲ့ အသုံးပြုနိင်တယ်။
Single Responsibility Principle ကို ချိုးဖောက်ထားပါတယ်။
Singleton pattern က class တစ်ခုကနေ အကုန် လုပ်လို့ရနေတာ မျိုး ဖြစ်တတ်ပါတယ်။
Decorator Pattern
Dectorator Pattern က Structural Pattern တစ်ခုဖြစ်ပါတယ်။ Dectorator Pattern က proxy နဲ့ ဆင်ပါတယ်။ လက်ရှိ ရှိနေသည့် class အပေါ်က ထပ်ပြီး အုပ်ထားသည့် သဘောပါ။ ဥပမာ Pizza ဆိုရင် base ပေါ်မှာ cheese ထည့်မယ် ခရမ်းချဥ်သီး ထည့်မယ် စသည်ဖြင့် အပေါ်မှာ ထပ်ထပ် ဖြည့်သွားသည့် သဘောမျိုးပါပဲ။
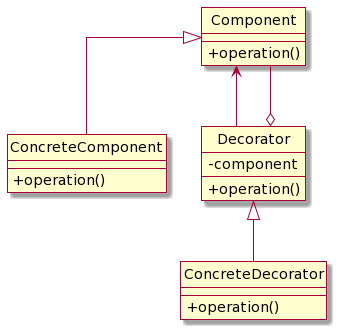
Proxy pattern နဲ့ ဆင်သလို ရှိပေမယ့် အသုံးပြုသည့် အကြောင်းအရာက မတူညီပါဘူး။ Proxy pattern ကတော့ action တစ်ခု မလုပ်ခင်မှာ တစ်ခုခု လုပ်လို့ရအောင် ပြင်လိုက်သည့် သဘောဖြစ်ပြီးတော့ Decorator pattern ကတော့ လက်ရှိ တခြား function တွေ ရအောင် ထပ် အုပ်သည့် သဘောပါ။
ဥပမာ

Notification server အတွက် SMS, Facebook, Slack ဆိုပြီး ရှိပါမယ်။ Notification ကို တစ်ခု ဆီ ပို့ရင် အဆင်ပြေပေမယ့် SMS နဲ့ Facebook တွဲပို့မယ်။ ဒါမှမဟုတ် Facebook နဲ့ Slack ပဲ ပို့မယ် ဆိုရင် အဆင်မပြေတော့ပါဘူး။ အဆင်ပြေအောင် class တွေ အများကြီး ထပ်ခွဲနေရပါမယ်။

ဒီလို class တွေ ခွဲထုတ်တာ အဆင်ပြေပေမယ့် Open Close Principle ကို မလိုက်နာတော့ပါဘူး။
Decorator pattern ပြန် သုံးမယ် ဆိုရင် အောက်ပါအတိုင်း ပြင်ပါမယ်။

ဒီ မှာဆိုရင် SMS, Facebook, Slack တွေက decorator ဖြစ်သွားပြီး send လုပ်သည့်အခါမှာ parent ရဲ့ send ကို ခေါ်ပြီးမှ သက်ဆိုင်ရာ ကို class ရဲ့ send ကို ခေါ်ပါမယ်။
Code level မှာ ရေးမယ် ဆိုရင် အောက်ပါ code အတိုင်း ဖြစ်ပါမယ်။
stack = new Notifier();
if(smsOn) {
    stack = new SMSDecorator(stack);
}
if(facebookOn) {
    stack = new FacebookDecorator(stack);
}
if(slackOn) {
    stack = new SlackDecorator(stack);
}
sendNotification(stack);
//it will send SMS -> Facebook -> Slack
Decorator pattern နဲ့ Code အရှည်ကို ကြည့်ရအောင်။
Notifier.java
// Notifier class
public interface Notifier {
    public void send(String message);
}
BaseDecorator.java
// BaseDecorator class
public class BaseDecorator implements Notifier {
    private Notifier wrap;

    public BaseDecorator(Notifier wrap) {
        this.wrap = wrap;
    }

    public void send(String message) {
        // Call the wrapped Notifier's send method
        wrap.send(message);
    }
}
SMSDecorator.java
// SMSDecorator class
public class SMSDecorator extends BaseDecorator {
    public SMSDecorator(Notifier wrap) {
        super(wrap);
    }

    @Override
    public void send(String message) {
        // Call the wrapped Notifier's send method
        super.send(message);

        // Implement additional functionality for sending an SMS
        sendSMS(message);
    }

    private void sendSMS(String message) {
        // Implementation for sending an SMS
    }
}
FacebookDecorator.java
// FacebookDecorator class
public class FacebookDecorator extends BaseDecorator {
    public FacebookDecorator(Notifier wrap) {
        super(wrap);
    }

    @Override
    public void send(String message) {
        // Call the wrapped Notifier's send method
        super.send(message);

        // Implement additional functionality for sending a Facebook message
        sendToFacebook(message);
    }

    private void sendToFacebook(String message) {
        // Implementation for sending a message to Facebook
    }
}
SlackDecorator.java
// SlackDecorator class
public class SlackDecorator extends BaseDecorator {
    public SlackDecorator(Notifier wrap) {
        super(wrap);
    }

    @Override
    public void send(String message) {
        // Call the wrapped Notifier's send method
        super.send(message);

        // Implement additional functionality for sending a Slack message
        sendToSlack(message);
    }

    private void sendToSlack(String message) {
        // Implementation for sending a message to Slack
    }
}
Application.java
public class Application {
    public static void main(String[] args) {


        Notifier smsNotifier = new SMSDecorator(null);
        Notifier facebookNotifier = new FacebookDecorator(smsNotifier);
        Notifier slackNotifier = new SlackDecorator(facebookNotifier);

        String message = "Hello, World!";
        slackNotifier.send(message);
    }
}
Code မှာ ရေးထားသည့် အတိုင်း send ကို မခေါ်ခင်မှာ သူ့အပေါ်က class ရဲ့ send ကိုအရင် ခေါ်ပြီး အလုပ်လုပ်သွားတာ တွေ့နိုင်ပါတယ်။
Proxy Pattern နဲ့ Decorator Pattern ဆင်ပါတယ် ။ ဒါပေမယ့် ရည်ရွယ်ချက်ခြင်း မတူတာကို တွေ့နိုင်တယ်။ Proxy Pattern ဟာ ကြားခံ လုပ်ဆောင်ဖို့ ဖန်တီး တာ ဖြစ်ပြီး decorator pattern က တော့ beahvior အသစ် အပေါ်မှာ ထပ်ပြီး အုပ်ထားတာ ဖြစ်ပါတယ်။
Pros and Cons
Class တွေကို ထပ်ကာထပ်ကာ extend လုပ်ပြီး အသုံးပြုနိုင်ပါတယ်။
Runtime မှာ responsiblity တွေကို ပြင်လို့ ရတယ်။
Single Responsibility Principle ကို လိုက်နာထားတယ်။
မကောင်းတာကတော့ ဘယ် wrapper ကို မသုံးတော့ဘူး ဆိုပြီး ဖယ်ထုတ်လိုက်ဖို့ ခက်ပါတယ်။
Class ဖန်တီးရတာ နည်းနည်း ခက်ခဲမှုရှိနိုင်တယ်။ Class က layers တွေ ထပ်ကာ ထပ်ကာ ရှိပြီး ရိုးရှင်းမှု ရှိမနေပါဘူး။
Visitor Pattern
Visitor pattern က behavioral design pattern တစ်ခု ပါ။ သူရဲ့ idea လေးက ရိုးရှင်းပါတယ်။ object တစ်ခုက အခြား object တွေ ဆီကို အလည်သွားခြင်းပါပဲ။
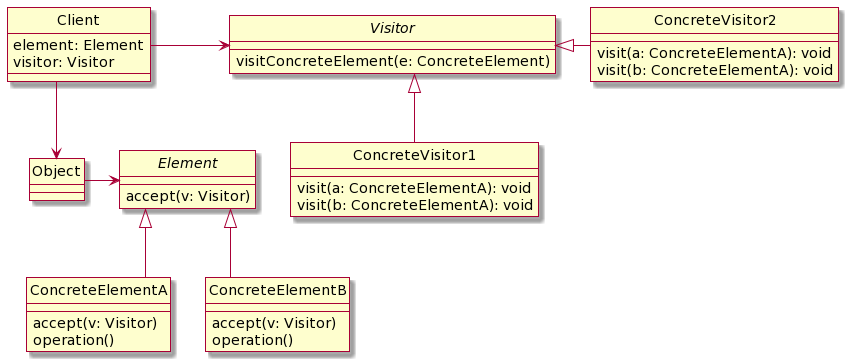
ဥပမာ Shape တွေကို area ရှာမည့် program တစ်ခု ရေးပါမယ်။
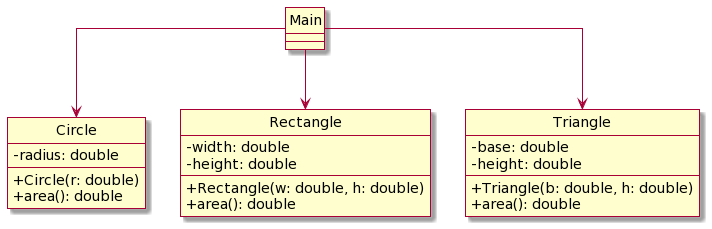
class Circle {
    double radius;

    Circle(double radius) {
        this.radius = radius;
    }

    double calculateArea() {
        return Math.PI * radius * radius;
    }
}

class Rectangle {
    double width;
    double height;

    Rectangle(double width, double height) {
        this.width = width;
        this.height = height;
    }

    double calculateArea() {
        return width * height;
    }
}

class Triangle {
    double base;
    double height;

    Triangle(double base, double height) {
        this.base = base;
        this.height = height;
    }

    double calculateArea() {
        return 0.5 * base * height;
    }
}

public class Main {
    public static void main(String[] args) {
        Circle circle = new Circle(5);
        Rectangle rectangle = new Rectangle(4, 6);
        Triangle triangle = new Triangle(3, 7);

        System.out.println("Circle area: " + circle.calculateArea());
        System.out.println("Rectangle area: " + rectangle.calculateArea());
        System.out.println("Triangle area: " + triangle.calculateArea());
    }
}
ဒီ code မှာ area တွက်ဖို့ class တိုင်းမှာ ထည့်ရေးထားရပါတယ်။ တနည်းပြောရင် Single Responbility မဟုတ်ပါဘူး။
calculateArea တွေက class တိုင်းမှာ ပါရမယ်ဆိုပြီး interface တစ်ခု ဆောက်လည်း ဖြစ်ပါတယ်။
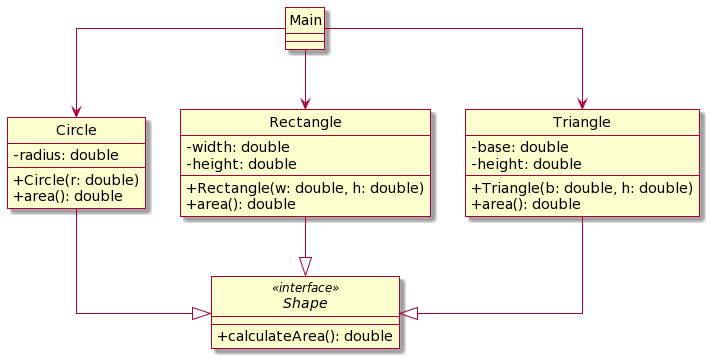
အကယ်၍ visitor pattern ကို သုံးမယ် ဆိုရင် အခု လို ပြင်လို့ရပါတယ်။
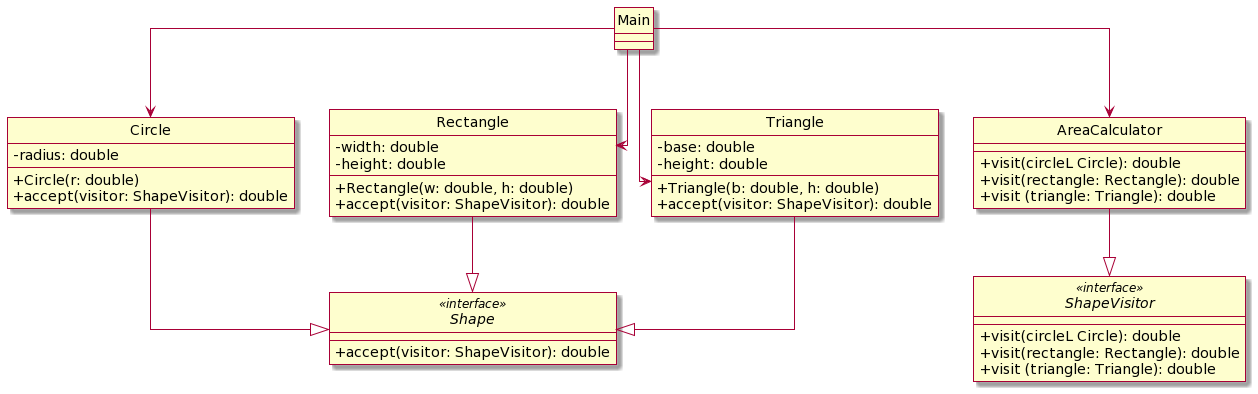
Area Visitor က Shape တွေ ဆီ visit သွားပြီး area တွက်ပေးမယ့် သဘောပါ။ Java code ကို ကြည့်ရအောင်။
interface ShapeVisitor {
    double visit(Circle circle);
    double visit(Rectangle rectangle);
    double visit(Triangle triangle);
}

class AreaCalculator implements ShapeVisitor {
    @Override
    public double visit(Circle circle) {
        return Math.PI * circle.radius * circle.radius;
    }

    @Override
    public double visit(Rectangle rectangle) {
        return rectangle.width * rectangle.height;
    }

    @Override
    public double visit(Triangle triangle) {
        return 0.5 * triangle.base * triangle.height;
    }
}

interface Shape {
    double accept(ShapeVisitor visitor);
}

class Circle implements Shape {
    double radius;

    Circle(double radius) {
        this.radius = radius;
    }

    @Override
    public double accept(ShapeVisitor visitor) {
        return visitor.visit(this);
    }
}

class Rectangle implements Shape {
    double width;
    double height;

    Rectangle(double width, double height) {
        this.width = width;
        this.height = height;
    }

    @Override
    public double accept(ShapeVisitor visitor) {
        return visitor.visit(this);
    }
}

class Triangle implements Shape {
    double base;
    double height;

    Triangle(double base, double height) {
        this.base = base;
        this.height = height;
    }

    @Override
    public double accept(ShapeVisitor visitor) {
        return visitor.visit(this);
    }
}

public class Main {
    public static void main(String[] args) {
        Circle circle = new Circle(5);
        Rectangle rectangle = new Rectangle(4, 6);
        Triangle triangle = new Triangle(3, 7);

        AreaCalculator areaCalculator = new AreaCalculator();

        System.out.println("Circle area: " + circle.accept(areaCalculator));
        System.out.println("Rectangle area: " + rectangle.accept(areaCalculator));
        System.out.println("Triangle area: " + triangle.accept(areaCalculator));
    }
}
အခု ဆိုရင် class က ပိုရိုးရှင်းသွားပြီး area calculation ကို သက်ဆိုင်ရာ AreaCalculator မှာပဲ လုပ်ပါတော့တယ်။ AreaCalculator က သက်ဆိုင်ရာ class ပေါ်မှာ မူတည်ပြီး အလုပ်လုပ်နိုင်အောင် visit ဆိုသည့် function ကို multiple လက်ခံအောင် လုပ်ထားပေးပါတယ်။
double visit(Circle circle);
double visit(Rectangle rectangle);
double visit(Triangle triangle);
Pros and Cons
Single Responsibility Principle ကို လိုက်နာ ထားပါတယ်။
Visitor object က complex structral တွေ ကို ရိုးရှင်းအောင် ပြောင်းလဲ အလုပ်လုပ်ပေးနိုင်ပါတယ်။
မကောင်းတာကတော့ လက်ရှိ class ထဲမှာ မပါသည့် class တစ်ခုကို visit လုပ်ချင်ရင် ထပ်ပြီး ဖြည့်ပေးရမှာ ဖြစ်ပြီး visitor class ကော ထပ်ဖြည့်မည့် class မှာပါ code ထပ်ဖြည့်ပေးရပါလိမ့်မယ်။
ကိုးကား
- Design Patterns: Elements of Reusable Object-Oriented
- Head First Design Patterns
- MIU မှ ASD course
- https://refactoring.guru/design-patterns
- Wikipedia